从蓝图到字节码 I —— 所以蓝图到底是什么?
好奇心召唤着冒险者们前往一座古老城堡——Blueprint。几十年来,我们听过无数关于如何驾驭它神奇力量的故事。但很少有人真正了解它的内部奥秘。所以系好安全带,我们要深入探索了。
本文内容基于Unreal Engine 5.4.0
如果我犯了错误,请在下面评论并帮助未来的读者!本文中文翻译由AI机翻,可能不够准确或产生一定的阅读困难。
前言
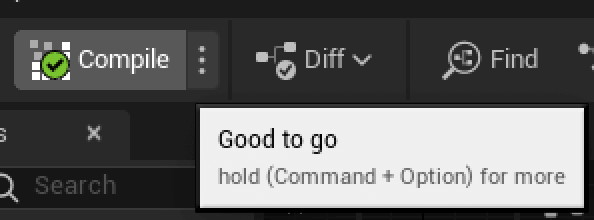
虚幻引擎因其强大的可视化脚本系统——Blueprint(前身是 Kismet)而闻名。关于如何使用蓝图的教程和指南数不胜数,但深入讲解其背后原理的资料却寥寥无几。当我们在可视化图表中拖拽节点、点击编译按钮,看到“Good to go”提示时,很容易以为一切就绪、直接开跑。但幕后究竟发生了什么?蓝图虚拟机(BPVM)是如何解释和执行这些图表的?本系列文章将深挖这些问题。所以,坐稳了,咱们一起潜入吧!
前人研究
Epic 发布过一份document,简要概述了蓝图的编译流程,但内容比较浅显,未涉及细节。幸运的是,社区也贡献了一些精彩研究。关于 BPVM,有Blueprint VM;关于蓝图编译,则有Blueprint I、Blueprint II 和 Blueprint III。
上面链接的博客是中文写的。英文读者可以用 ChatGPT 等工具辅助翻译。{: .prompt-tip }
尽管这些文章质量很高、非常值得一读,但我们仍会以更全面的方式梳理关键概念和术语,为后续挑战打好共同基础。
Blueprint System
当人们谈论“一个写得很棒的蓝图”时,通常指的是在蓝图编辑器中创建的可视化脚本图表。在引擎内部,这类图表由 UEdGraph 对象管理。但要注意:图表(比如事件图表)并非蓝图编辑器本身,而是它的一部分。蓝图编辑器其实是多个 UEdGraph、面板和工具的组合体。
简单来说,在内容浏览器中创建蓝图资产时,首先要选择一个父类,然后通过蓝图系统定义新的子类。蓝图编辑器允许我们在 UEdGraph 实例中添加函数和逻辑,并设置各类属性。当我们点击编辑器中的编译按钮时,编译流程就会启动,将 UEdGraph 中的内容处理并封装成可复用的 UBlueprintGeneratedClass。这个类包含引擎运行时执行的字节码,确保我们定义的行为和逻辑能融入游戏中。
 Blueprint System Overview
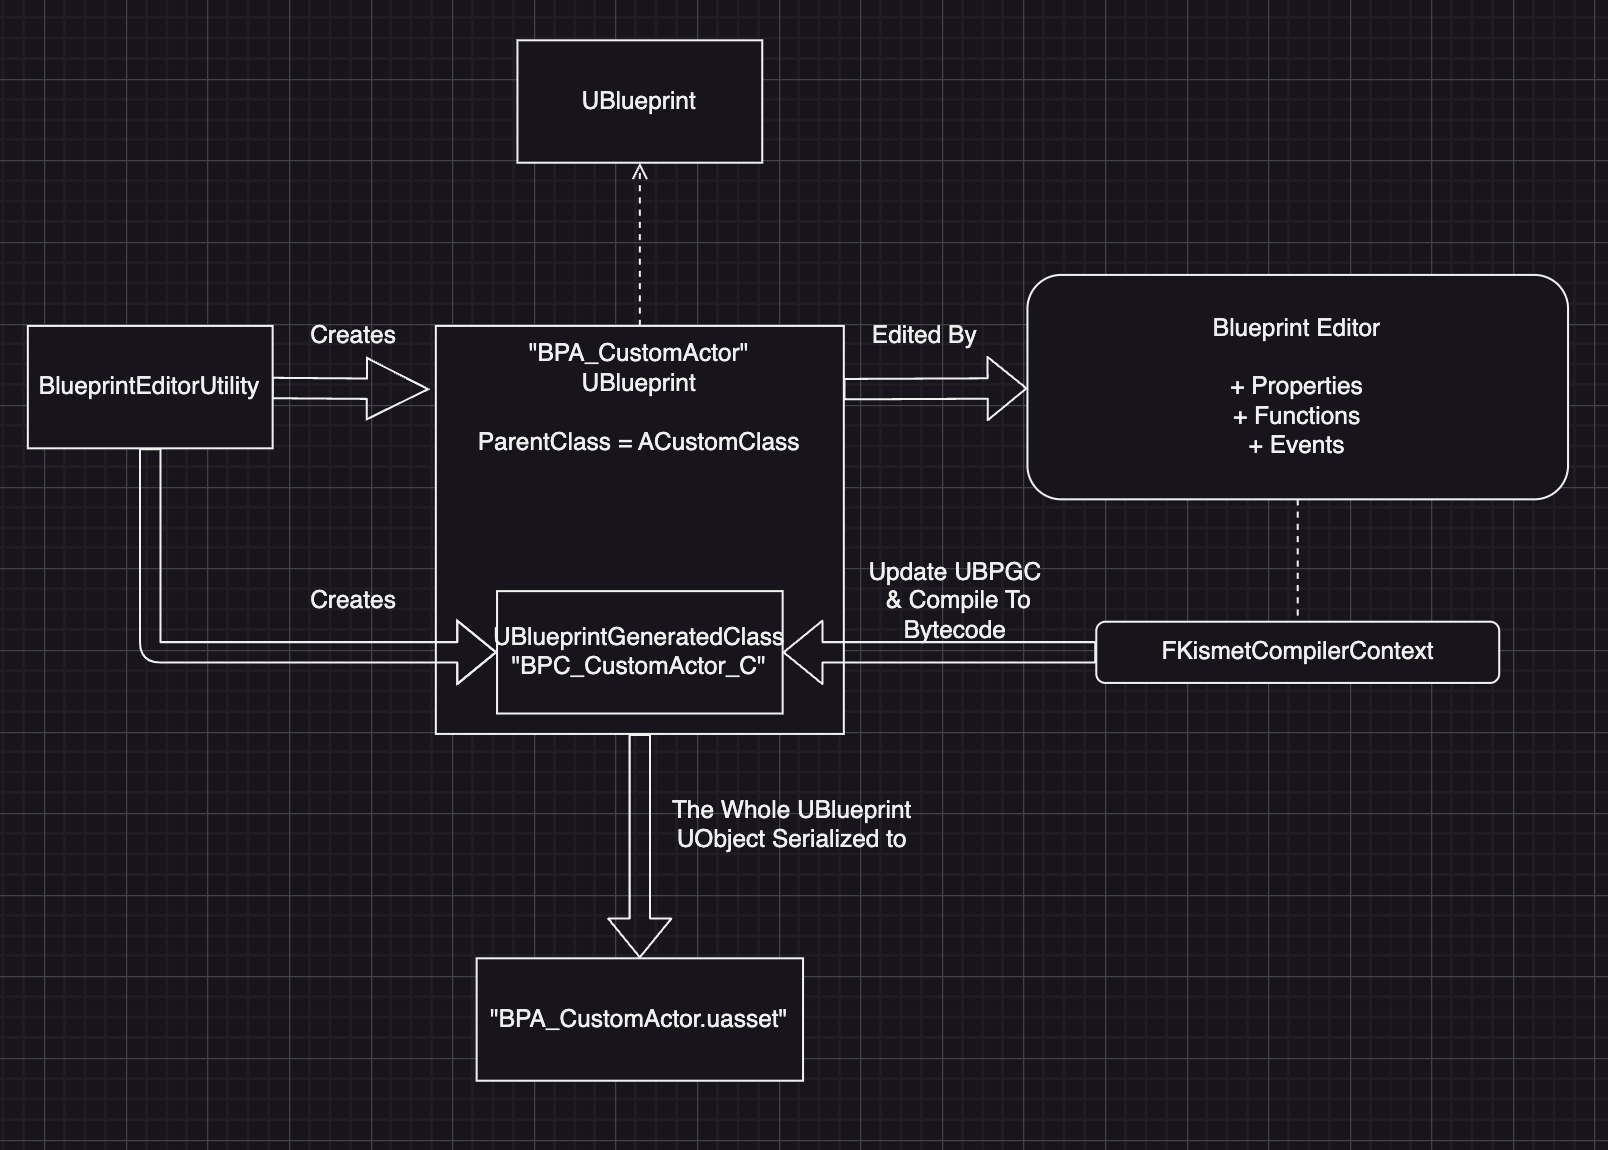
 Blueprint Structure (Source: 1)
UBlueprint
当我们从Content Browser中基于自定义类类型(比如 ACustomClass)创建新蓝图时,实际上生成的是一个蓝图资产——更准确地说,是一个 UBlueprint 对象。这个对象仅存在于编辑器环境中,最终在磁盘上会生成 .uasset 后缀的文件,它就是 UBlueprint 对象的序列化形式。
来看看代码实现:
1
2
3
4
5
6
7
8
9
10
11
12
13
/** Create a new Blueprint and initialize it to a valid state. */
UBlueprint* FKismetEditorUtilities::CreateBlueprint(UClass* ParentClass, UObject* Outer, const FName NewBPName, EBlueprintType BlueprintType, TSubclassOf<UBlueprint> BlueprintClassType, TSubclassOf<UBlueprintGeneratedClass> BlueprintGeneratedClassType, FName CallingContext)
{
    // ... Other code

    // Create new UBlueprint object
    UBlueprint* NewBP = NewObject<UBlueprint>(Outer, *BlueprintClassType, NewBPName, RF_Public | RF_Standalone | RF_Transactional | RF_LoadCompleted);
    // ... Other code
    NewBP->ParentClass = ParentClass;
    // ... Other code

    return NewBP;
}
当调用 FKismetEditorUtilities::CreateBlueprint()时,它会立即创建一个 UBlueprint 实例,并将 NewBP->ParentClass 设为指定的 ParentClass(本例中即 ACustomClass)。这就是为什么有些文档会说创建的蓝图是 ACustomClass 的子类。但严格来说这个说法是错误的——实际上生成的是持有 ParentClass(即 ACustomClass)指针的 UBlueprint 对象,而非它的子类。
UBlueprintGeneratedClass
如前所述,执行蓝图逻辑时,我们并不是直接运行 UBlueprint 对象(因为它只存在于编辑器中),而是在执行编译后的字节码。这些字节码存储在 UBlueprint 的编译版本里,也就是 UBlueprintGeneratedClass
虽然技术上蓝图编辑器会触发生成
UBlueprintGeneratedClass,但这只是个占位符。真正的编译工作由FKismetCompilerContext完成——它将可视化脚本节点编译成可执行代码(字节码),并回写到UBlueprintGeneratedClass中。
正如 UBlueprint 并非 ACustomClass 的子类,UBlueprintGeneratedClass 也不是 ACustomClass 的子类。所以根本不存在这样的继承关系:
1
2
3
4
class UBlueprintGeneratedClass : public ACustomClass
{
    // ...
};
相对的,UBlueprintGeneratedClass 直接继承自 UClass,并实现了 IBlueprintPropertyGuidProvider 接口。
1
2
3
4
class UBlueprintGeneratedClass : public UClass, public IBlueprintPropertyGuidProvider
{
    // ...
};
UBlueprintGeneratedClass 和 UBlueprint 对象略有不同。我们在Content Browser里看到的资产其实是 UBlueprint 实例(作为 UObject 被序列化为 .uasset),而 UBlueprintGeneratedClass 只是个类而非实例。它与父类的关系通过 SuperClass 机制维护:设置父类时引擎调用 SetSuperStruct(),获取时则用 GetSuperClass()。这使得 UBlueprintGeneratedClass 看起来像是某个 UClass 的子类。
以下是创建 UBlueprint 实例后的代码:
1
2
3
4
5
6
7
8
9
10
11
12
13
14
15
16
17
18
19
20
21
/** Create a new Blueprint and initialize it to a valid state. */
UBlueprint* FKismetEditorUtilities::CreateBlueprint(UClass* ParentClass, UObject* Outer, const FName NewBPName, EBlueprintType BlueprintType, TSubclassOf<UBlueprint> BlueprintClassType, TSubclassOf<UBlueprintGeneratedClass> BlueprintGeneratedClassType, FName CallingContext)
{
    // ... Other code

    // Create SimpleConstructionScript and UserConstructionScript
    if (FBlueprintEditorUtils::SupportsConstructionScript(NewBP))
    {
        // ... Other code
        UBlueprintGeneratedClass* NewClass = NewObject<UBlueprintGeneratedClass>(
            NewBP->GetOutermost(), *BlueprintGeneratedClassType, NewGenClassName, RF_Public | RF_Transactional);
        NewBP->GeneratedClass = NewClass;
        NewClass->ClassGeneratedBy = NewBP;
        NewClass->SetSuperStruct(ParentClass);
        // <<< Temporary workaround
    }

    // ... Other code

    return NewBP;
}
UEdGraph
UEdGraph 代表一个“图”(graph),本质上就是一堆节点(nodes)和连线(connections)的集合。在蓝图(Blueprint)里,UEdGraph 用来表示可视化脚本图的数据,比如事件图(Event Graph)、函数图(Function Graph)和宏图(Macro Graph)。UEdGraph 负责管理图里的节点和连线,并提供必要的接口让蓝图编辑器(Blueprint Editor)和它交互。
UEdGraph 有几个子类,比如 UAIGraph、UAnimationGraph、UAnimationStateMachineGraph、UMaterialGraph 等等。简单来说,当你打开某个资源,看到一个能拖拽节点的地方,背后的类型通常就是 UEdGraph。
需要注意的是,UEdGraph 只是图的“数据”部分,不是它的“视觉显示”。我们在编辑器里看到的那个花花绿绿的图,其实是由一个叫 SGraphEditor 的 Slate UI 控件负责渲染的,它才是前端交互的“门面担当”。
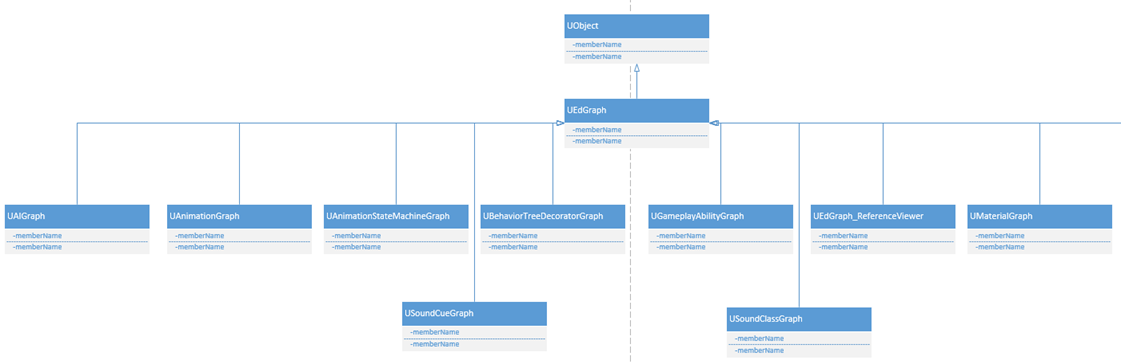 UEdGraph (Source: 1)
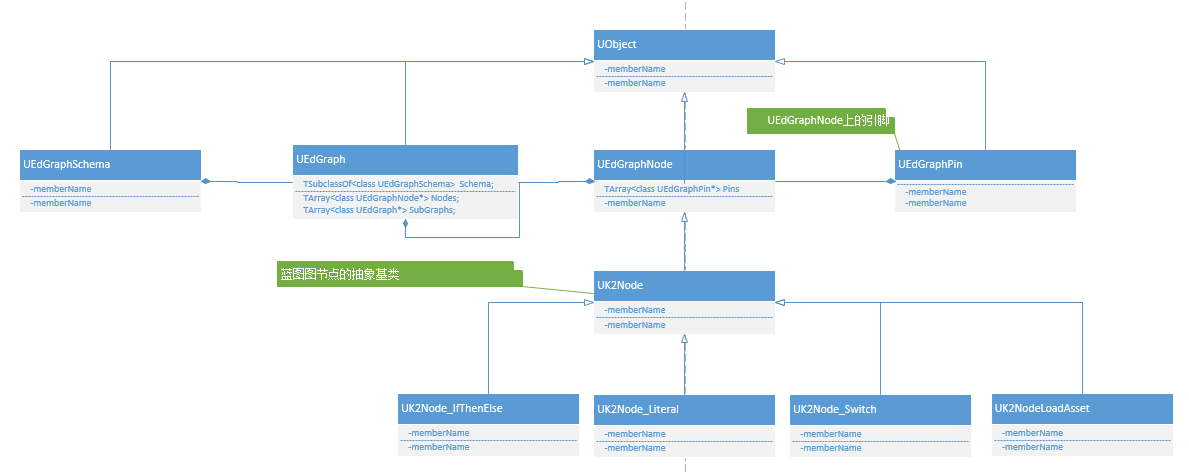
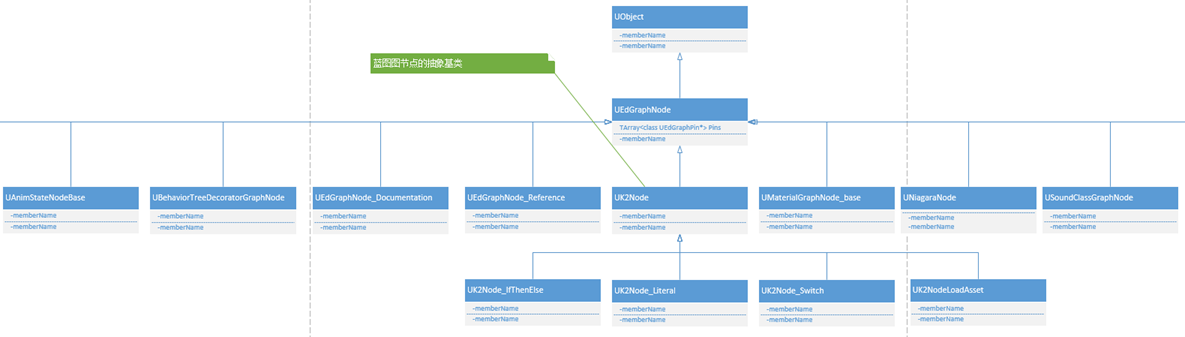
UEdGraphNode
UEdGraphNode 是 Unreal Engine 图中节点的基类,属于图数据结构的一部分,负责保存单个节点的逻辑和属性,不管是事件图、函数图还是其他类型的图。
每个 UEdGraphNode 都包含执行或表示某个操作所需的逻辑和数据。比如,一个节点可能代表一次函数调用、一个变量赋值,或者像“打印字符串(Print String)”这样的动作。
UEdGraphNode 有很多子类,比如 UAnimStatesNode、UNiagaraNode 等等,它们会根据图的类型提供特定功能。有趣的是,蓝图图的节点并不叫 UBlueprintNode,而是叫 UK2Node。
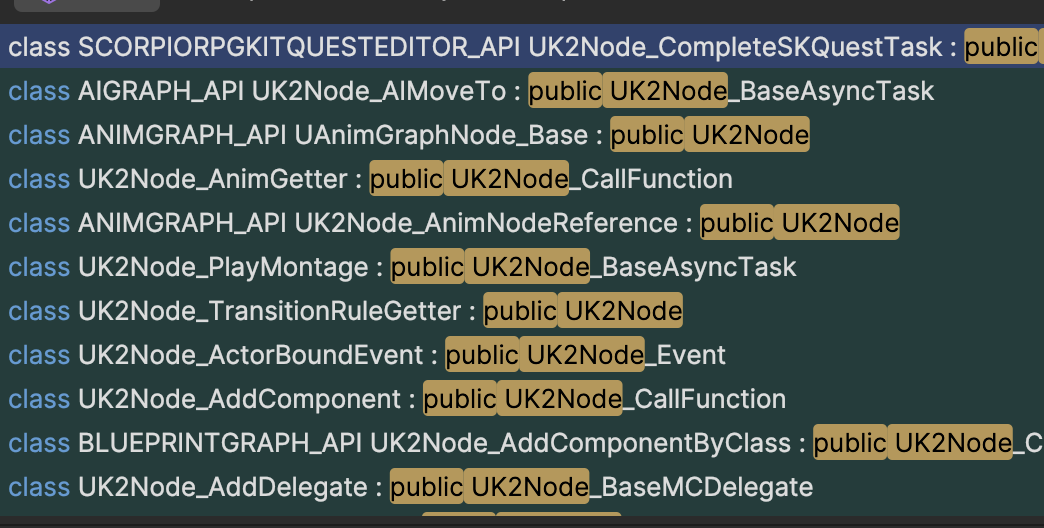 Various UK2Nodes
和 UEdGraph 一样,UEdGraphNode 也有自己的“视觉形象”,由 SGraphNode 负责渲染。
 UEdGraphNode (Source: 1)
UEdGraphPin
UEdGraphNode 通过 UEdGraphPin 对象和其他节点保持连接,这些“引脚”(pins)负责在节点之间传递执行流或数据。
UEdGraphPin 是节点之间的“通信点”,可以是输入引脚(数据流入节点)或输出引脚(数据流出节点)。
每个引脚都能和其他引脚连接,但系统会强制检查类型是否兼容。比如,整数(integer)引脚可以连到浮点数(float)引脚,因为能隐式转换,但完全不相干的类型(比如字符串连布尔值)就不行。
和节点一样,引脚在蓝图编辑器里也有视觉表现,用户可以通过拖拽来连接它们,这部分交互由 SGraphPin 类管理。
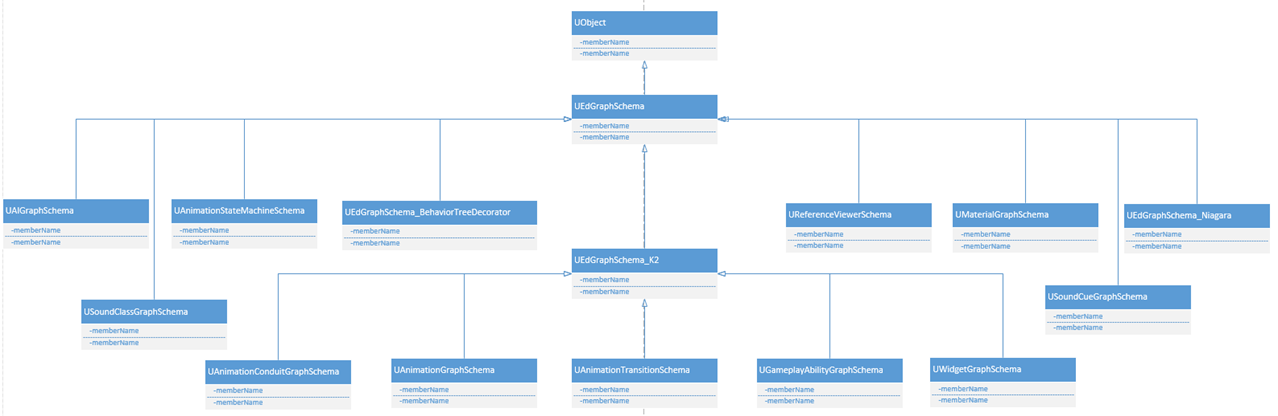
UEdGraphSchema
UEdGraphSchema 定义了某类图的规则和约定,本质上就是节点和引脚如何交互的“蓝图”(没错,字面意义上的“蓝图”)。它负责描述合法的节点连接、节点行为,确保图能按预期工作。
每种图(蓝图、动画、AI 等)都有自己对应的 UEdGraphSchema 子类,比如:
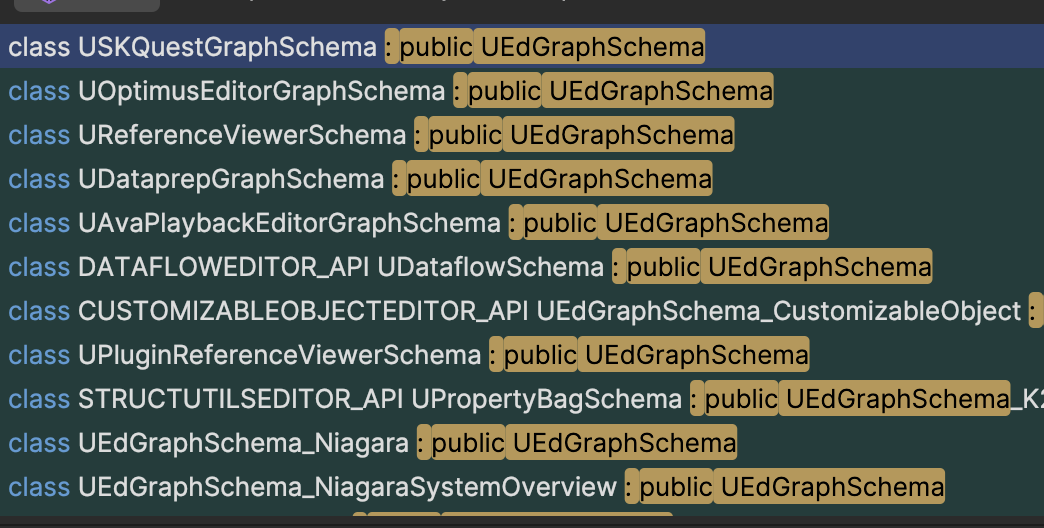 Other Schemas
UEdGraphSchema 还能自定义节点的创建和摆放规则。比如,当用户右键点击添加新节点时,哪些节点应该出现在菜单里。此外,它还规定了引脚之间的连接规则,比如哪些类型的引脚能互相连接,或者连线应该怎么建立。
 UEdGraphSchema (Source: 1)
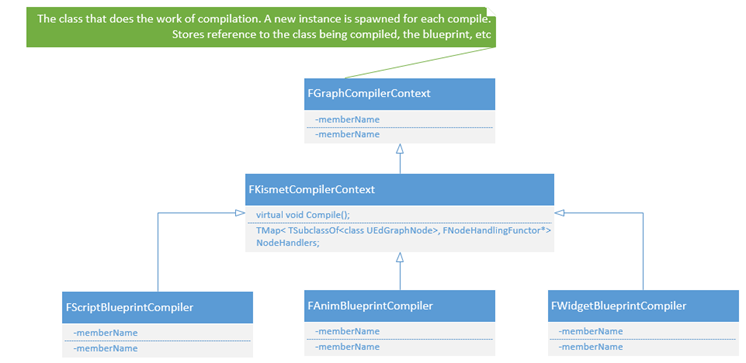
FKismetCompilerContext
FKismetCompilerContext 是编译蓝图图(Blueprint graph)的核心类,负责把图转换成蓝图虚拟机(VM)能执行的字节码(bytecode)。它是编译过程的“总指挥”,负责节点翻译、验证,以及生成中间表示(IR)。
FKismetCompilerContext 会先把可视化脚本图(由 UEdGraph、UEdGraphNode 等表示)转换成由 FBlueprintCompiledStatement 对象组成的中间格式,最终再编译成虚拟机可执行的字节码。它掌控整个编译流程,确保图中的所有节点都被正确翻译和连接。
 FKismetCompilerContext (Source: 1)
FKismetFunctionContext
FKismetFunctionContext 是 Blueprint 中单个函数或图的编译上下文。它就像个百宝箱,装着编译特定函数所需的所有数据:变量定义、控制流、独立语句等等。
在编译过程中,FKismetFunctionContext 会记录函数的”本地小秘密”——比如变量、临时值和流程控制结构。它的终极使命是确保函数里的每个节点都能被翻译成合法的中间表示(FBlueprintCompiledStatement)。
FBlueprintCompiledStatement
FBlueprintCompiledStatement 是 Blueprint 图中单个可执行操作的”中间人”。换句话说,一个函数里可能躺着好多FBlueprintCompiledStatement对象。
每个FBlueprintCompiledStatement都代表图中的某个具体操作。这些语句在编译过程中生成,最后会变身成 VM 字节码。下面是BlueprintCompiledStatement.h中所有的FBlueprintCompiledStatement类型全家福:
1
2
3
4
5
6
7
8
9
10
11
12
13
14
15
16
17
18
19
20
21
22
23
24
25
26
27
28
29
30
31
32
33
34
35
36
37
38
39
40
41
42
43
44
45
46
47
48
49
50
51
52
53
54
55
56
57
58
59
60
61
62
63
64
65
66
67
68
69
70
71
72
73
74
75
76
77
78
79
80
81
82
83
84
85
86
87
88
89
90
91
92
93
94
95
//////////////////////////////////////////////////////////////////////////
// FBlueprintCompiledStatement

enum EKismetCompiledStatementType
{
    KCST_Nop = 0,
    // [wiring =] TargetObject->FunctionToCall(wiring)
    KCST_CallFunction = 1,
    // TargetObject->TargetProperty = [wiring]
    KCST_Assignment = 2,
    // One of the other types with a compilation error during statement generation
    KCST_CompileError = 3,
    // goto TargetLabel
    KCST_UnconditionalGoto = 4,
    // FlowStack.Push(TargetLabel)
    KCST_PushState = 5,
    // [if (!TargetObject->TargetProperty)] goto TargetLabel
    KCST_GotoIfNot = 6,
    // return TargetObject->TargetProperty
    KCST_Return = 7,
    // if (FlowStack.Num()) { NextState = FlowStack.Pop; } else { return; }
    KCST_EndOfThread = 8,
    // Comment
    KCST_Comment = 9,
    // NextState = LHS;
    KCST_ComputedGoto = 10,
    // [if (!TargetObject->TargetProperty)] { same as KCST_EndOfThread; }
    KCST_EndOfThreadIfNot = 11,
    // NOP with recorded address
    KCST_DebugSite = 12,
    // TargetInterface(TargetObject)
    KCST_CastObjToInterface = 13,
    // Cast<TargetClass>(TargetObject)
    KCST_DynamicCast = 14,
    // (TargetObject != None)
    KCST_ObjectToBool = 15,
    // TargetDelegate->Add(EventDelegate)
    KCST_AddMulticastDelegate = 16,
    // TargetDelegate->Clear()
    KCST_ClearMulticastDelegate = 17,
    // NOP with recorded address (never a step target)
    KCST_WireTraceSite = 18,
    // Creates simple delegate
    KCST_BindDelegate = 19,
    // TargetDelegate->Remove(EventDelegate)
    KCST_RemoveMulticastDelegate = 20,
    // TargetDelegate->Broadcast(...)
    KCST_CallDelegate = 21,
    // Creates and sets an array literal term
    KCST_CreateArray = 22,
    // TargetInterface(Interface)
    KCST_CrossInterfaceCast = 23,
    // Cast<TargetClass>(TargetObject)
    KCST_MetaCast = 24,
    KCST_AssignmentOnPersistentFrame = 25,
    // Cast<TargetClass>(TargetInterface)
    KCST_CastInterfaceToObj = 26,
    // goto ReturnLabel
    KCST_GotoReturn = 27,
    // [if (!TargetObject->TargetProperty)] goto TargetLabel
    KCST_GotoReturnIfNot = 28,
    KCST_SwitchValue = 29,

    KCST_DoubleToFloatCast = 30,
    KCST_FloatToDoubleCast = 31,

    //~ Kismet instrumentation extensions:

    // Instrumented event
    KCST_InstrumentedEvent,
    // Instrumented event stop
    KCST_InstrumentedEventStop,
    // Instrumented pure node entry
    KCST_InstrumentedPureNodeEntry,
    // Instrumented wiretrace entry
    KCST_InstrumentedWireEntry,
    // Instrumented wiretrace exit
    KCST_InstrumentedWireExit,
    // Instrumented state push
    KCST_InstrumentedStatePush,
    // Instrumented state restore
    KCST_InstrumentedStateRestore,
    // Instrumented state reset
    KCST_InstrumentedStateReset,
    // Instrumented state suspend
    KCST_InstrumentedStateSuspend,
    // Instrumented state pop
    KCST_InstrumentedStatePop,
    // Instrumented tunnel exit
    KCST_InstrumentedTunnelEndOfThread,

    KCST_ArrayGetByRef,
    KCST_CreateSet,
    KCST_CreateMap,
};
FBPTerminal
FBPTerminal 是FBlueprintCompiledStatement中使用的变量或表达式的”替身演员”,专门负责在 Blueprint 图中搬运数据或对象。
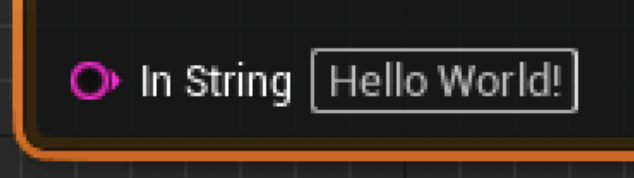 “Hello World” Literal FBPTerminal
FNodeHandlingFunctor
FNodeHandlingFunctor 是个”翻译官”,专门在编译过程中处理特定类型节点的转换工作。每种UEdGraphNode类型都配有一个专属的FNodeHandlingFunctor,知道怎么把对应节点变成中间表示(FBlueprintCompiledStatement)。
 FNodeHandlingFunctor (Source: 1)
每个UK2Node子类都有对应的FNodeHandlingFunctor子类,专门定义该怎么编译这种节点。比如:
1
2
3
4
5
6
7
8
9
10
11
12
13
14
15
16
//////////////////////////////////////////////////////////////////////////
// FKCHandler_Select

class FKCHandler_Select : public FNodeHandlingFunctor
{
protected:
    TMap<UEdGraphNode*, FBPTerminal*> DefaultTermMap;

public:
    FKCHandler_Select(FKismetCompilerContext& InCompilerContext)
        : FNodeHandlingFunctor(InCompilerContext);

    virtual void RegisterNets(FKismetFunctionContext& Context, UEdGraphNode* Node) override;

    virtual void Compile(FKismetFunctionContext& Context, UEdGraphNode* Node) override;
};
上面这段代码显示,FKCHandle_Select就是UK2Node_Select的专属处理器。它实现了两个关键函数:RegisterNets()和Compile()。
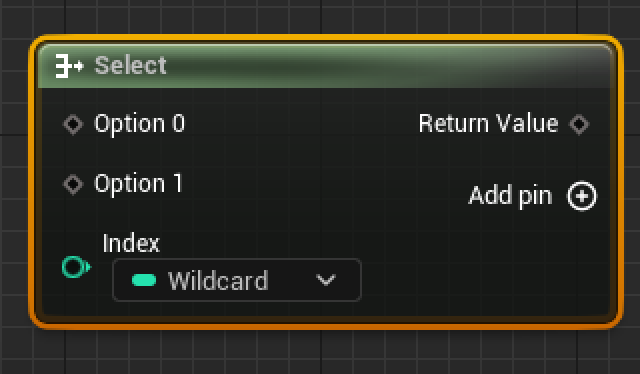 Select Node
RegisterNets()
RegisterNets()负责给节点的输入输出引脚”上户口”,创建对应的FBPTerminal对象来代表这些引脚。比如只要有东西连接到选项引脚(options pin)或索引引脚(index pin),就会在这个阶段登记注册。这个函数在PrecompileFunction()和CreateLocalsAndRegisterNets()里都会被召唤。
1
2
3
4
5
6
7
8
9
10
11
12
13
14
15
16
17
18
19
20
21
22
23
24
25
26
27
28
29
30
31
32
33
34
35
36
37
38
39
40
41
42
43
44
45
46
47
48
49
50
51
52
53
54
55
56
/**
 * First phase of compiling a function graph
 *   - Prunes the 'graph' to only included the connected portion that contains the function entry point
 *   - Schedules execution of each node based on data dependencies
 *   - Creates a UFunction object containing parameters and local variables (but no script code yet)
 */
void FKismetCompilerContext::PrecompileFunction(FKismetFunctionContext& Context, EInternalCompilerFlags InternalFlags)
{
    // ... Other Code

    if (EntryPoints.Num())
    {
        Context.EntryPoint = EntryPoints[0];

        // Register nets from function entry/exit nodes first, even for skeleton compiles (as they form the signature)
        // We're violating the FNodeHandlingFunctor abstraction here because we want to make sure that the signature
        // matches even if all result nodes were pruned:
        bool bReturnNodeFound = false;
        for (UEdGraphNode* Node : Context.SourceGraph->Nodes)
        {
            // ... Other Code

            if (FNodeHandlingFunctor* Handler = NodeHandlers.FindRef(Node->GetClass()))
            {
                if (Handler->RequiresRegisterNetsBeforeScheduling())
                {
                    Handler->RegisterNets(Context, Node);
                }
            }
        }
        // ... Other Code
    }
}

void FKismetCompilerContext::CreateLocalsAndRegisterNets(FKismetFunctionContext& Context, FField**& FunctionPropertyStorageLocation)
{
    // ... Other Code
    if (bIsFullCompile)
    {
        // ... Other Code

        // Register nets for any nodes still in the schedule (as long as they didn't get registered in the initial all-nodes pass)
        for (UEdGraphNode* Node : Context.LinearExecutionList)
        {
            if (FNodeHandlingFunctor* Handler = NodeHandlers.FindRef(Node->GetClass()))
            {
                if (!Handler->RequiresRegisterNetsBeforeScheduling())
                {
                    Handler->RegisterNets(Context, Node);
                }
            }
            // ... Other Code
        }
    }
    // ... Other Code
}
CreateLocalsAndRegisterNets()可能在PrecompileFunction()或CompileFunction()中被调用。之所以说”或”,是因为正常情况下PrecompileFunction()会调用它,但如果传入了EInternalCompilerFlags::PostponeLocalsGenerationUntilPhaseTwo参数,PrecompileFunction()就会跳过这一步,改由”第二阶段”的CompileFunction()来调用。
EInternalCompilerFlags::PostponeLocalsGenerationUntilPhaseTwo这个标志是在FBlueprintCompilationManagerImpl::FlushCompilationQueueImpl()里传给CompileFunction()的。BlueprintCompilationManager本身是个大话题,这里就先不展开了。
Compile()
Compile()函数负责根据节点的输入输出引脚,生成对应的中间表示(FBlueprintCompiledStatement)。让我们近距离围观:
1
2
3
4
5
6
7
8
9
10
11
12
13
14
15
16
17
18
19
20
21
22
23
24
25
26
27
28
29
30
31
32
33
34
35
36
37
38
39
40
41
42
virtual void Compile(FKismetFunctionContext& Context, UEdGraphNode* Node) override
{
    // I. Declare FBPTerminals
    UK2Node_Select* SelectNode = CastChecked<UK2Node_Select>(Node);
    FBPTerminal* DefaultTerm = nullptr;
    FBPTerminal* ReturnTerm = nullptr;
    FBPTerminal* IndexTerm = nullptr;

    {
        // II. Try to get value for these terms
        // ... Other Code
    }

    // III. Create FBlueprintCompiledStatement for SelectNode
    FBlueprintCompiledStatement* SelectStatement = new FBlueprintCompiledStatement();
    SelectStatement->Type = EKismetCompiledStatementType::KCST_SwitchValue;

    // IV. Get the option pins
    TArray<UEdGraphPin*> OptionPins;
    SelectNode->GetOptionPins(OptionPins);

    // V. Go through each option and add their value to SelectStatement
    for (int32 OptionIdx = 0; OptionIdx < OptionPins.Num(); ++OptionIdx)
    {
        {
            FBPTerminal* LiteralTerm = Context.CreateLocalTerminal(ETerminalSpecification::TS_Literal);
            // ... Other Code
            SelectStatement->RHS.Add(LiteralTerm);
        }
        {
            UEdGraphPin* NetPin = OptionPins[OptionIdx] ? FEdGraphUtilities::GetNetFromPin(OptionPins[OptionIdx]) : nullptr;
            FBPTerminal** ValueTermPtr = NetPin ? Context.NetMap.Find(NetPin) : nullptr;
            FBPTerminal* ValueTerm = ValueTermPtr ? *ValueTermPtr : nullptr;

            // ... Other Code
            SelectStatement->RHS.Add(ValueTerm);
        }
    }

    // VI. Add DefaultTerm to SelectStatement
    SelectStatement->RHS.Add(DefaultTerm);
}
SelectNode的Compile()函数基本上遵循六个步骤:
- 声明
FBPTerminals:- 先给需要的FBPTerminal对象办个”出生证明”
- 获取Term的值:
- 把这些term的值都捞出来
- 创建
FBlueprintCompiledStatement:- 为
SelectNode创建一个FBlueprintCompiledStatement,类型设为KCST_SwitchValue
- 为
- 收集选项引脚:
- 把所有的选项引脚都抓过来
- 处理每个选项:
- 给每个选项的值都塞进
SelectStatement
- 给每个选项的值都塞进
- 添加默认Term:
- 最后把DefaultTerm也塞进
SelectStatement
- 最后把DefaultTerm也塞进
Literal Term
- 为每个选项创建一个Literal类型的
FBPTerminal。这相当于给每个选项配了个”身份证号”(比如匹配选项的索引值)。如果选项引脚关联着枚举,term就用枚举名;否则默认用基于索引的名字。
Value Term
- 为每个选项引脚,从上下文里找出对应的
value term。如果找不到就记个错误日志,然后把找到的值塞进操作的右手边(RHS), 这里是右值的概念。
到这里就清楚了:SelectNode的Compile()函数会创建一个FBlueprintCompiledStatement,把类型设为KCST_SwitchValue,然后把所有需要的数据喂给SelectStatement对象。
FBlueprintCompileReinstancer
FBlueprintCompileReinstancer是Unreal Engine里的”拆迁办”,专门在Blueprint类重新编译时帮忙重建对象实例。为啥需要重建呢?因为游戏世界里现有的Blueprint类实例也得跟上新编译出来的的。他们没有见过的船新版本。
当Blueprint类重新编译后,结构变化(比如新增变量或修改逻辑)可能导致游戏世界里现有的实例和新版类定义”闹矛盾”。FBlueprintCompileReinstancer就是来当和事佬的,确保这些实例能正确更新或替换,避免程序崩溃或数据错乱。
FKismetCompilerOptions
FKismetCompilerOptions 是一个配置类,定义了蓝图编译过程中的各种选项和设置。它允许你自定义蓝图的编译方式,比如调试信息生成、优化级别和错误处理策略等。
这个配置会被传递给 FKismetCompilerContext,用来控制编译的具体行为,比如是否生成调试数据,或者是否启用严格验证模式。
其实看头文件注释就能一目了然它的作用啦:
1
2
3
4
5
6
7
8
9
10
11
12
13
14
15
16
17
18
19
20
21
22
23
24
25
26
27
28
29
30
31
/** Options used for a specific invication of the blueprint compiler */
struct FKismetCompilerOptions
{
public:
    /** The compile type to perform (full compile, skeleton pass only, etc) */
    EKismetCompileType::Type    CompileType;

    /** Whether or not to save intermediate build products (temporary graphs and expanded macros) for debugging */
    bool bSaveIntermediateProducts;

    /** Whether to regenerate the skeleton first, when compiling on load we don't need to regenerate the skeleton. */
    bool bRegenerateSkelton;

    /** Whether or not this compile is for a duplicated blueprint */
    bool bIsDuplicationInstigated;

    /** Whether or not to reinstance and stub if the blueprint fails to compile */
    bool bReinstanceAndStubOnFailure;

    /** Whether or not to skip class default object validation */
    bool bSkipDefaultObjectValidation;

    /** Whether or not to update Find-in-Blueprint search metadata */
    bool bSkipFiBSearchMetaUpdate;

    /** Whether or not to use Delta Serialization when copying unrelated objects */
    bool bUseDeltaSerializationDuringReinstancing;

    /** Whether or not to skip new variable defaults detection */
    bool bSkipNewVariableDefaultsDetection;
};
Skeleton Class
Skeleton Class 是蓝图编译过程中使用的中间表示形式,相当于一个轻量级的占位符。它只包含类的基本结构信息(比如变量和函数声明),但没有完整的实现细节。
你可以把
SKEL类想象成一个更聪明的“前置声明”或者头文件。它在字节码编译之前生成,仅提供类的元数据。关键区别在于,编译后没有传统头文件那样的链接过程。
Skeleton Class 的存在主要是为了解决蓝图循环依赖问题。比如两个蓝图互相引用时,引擎会先创建它们的 Skeleton Class,这样就能绕过“鸡生蛋蛋生鸡”的困境。它相当于一个最小化的类版本,在完整编译完成前供编辑器临时使用。
当一个蓝图调用另一个尚未完全编译的蓝图函数时,Skeleton Class 就会作为临时代表顶班上岗~
CDO
Class Default Object(CDO)是一个类的特殊实例,相当于该类的“原型模板”。Unreal Engine 会为每个类(包括蓝图类)自动生成一个 CDO。
CDO 的使命是存储类的默认属性值和配置。当你创建一个类的新实例时,所有属性都会以 CDO 的值为起点进行初始化。简单说,CDO 就是类的“出厂设置”说明书。
在蓝图编辑器中修改默认属性?其实你就是在调整 CDO。而当你把某个实例的属性“回退到默认值”时,引擎其实就是用 CDO 的值覆盖当前值。
篝火已燃,下一步?
呼——信息量爆炸对不对?我们已经梳理了蓝图系统的基本结构,包括:
UBlueprintUBlueprintGeneratedClassUEdGraphUEdGraphNodeUEdGraphPinUEdGraphSchemaFKismetCompilerContextFKismetFunctionContextFBlueprintCompiledStatementFBPTerminalFNodeHandlingFunctorFBlueprintCompileReinstancerFKismetCompilerOptionsSkeleton ClassCDO
就像在黑暗城堡中找到安全屋并点燃篝火,我们终于迈出了探索蓝图系统的第一步。不过……阴影中似乎还藏着什么秘密呢?