Lyra Breakdown - Game Core Animation
Sword? Slash. Hammer? Smash. Gun? Shoot. Bow? Draw. Staff? Cast. Shield? Block. Fist? Punch. Foot? Kick. Intuitive and simple, what's the problem? Well we need to program it, no, not 7 if-switches in Character class, we don't do that anymore, instead, we are doing something 10x more complicated, buckle up.
The content in this post is based on Unreal Engine 5.5.4
If I made a mistake, please comment below and help future readers!
This is a series of notes about what I’ve learned from Epic’s Lyra project. Which claim to be the best practices under current unreal engine framework. Some I don’t know about, some I already know but I thought it would still be good noting down.
Animation System Structure
Epic has already released an official document about Animations In Lyra. The whole structure of animation system in Lyra can be summarized as:
- The
Character BPreferencing theAnimation Blueprintto drive the character skeleton. - The
Animation Blueprintis a framework that only contains the logic and transitions between different animation states. No actual animation assets are referenced here. - The actual animation assets are being dynamically injected into the Animation Blueprint as an
Animation Linked Layer. This allows for a modular approach to animation, where different layers can be swapped in and out depending on the character’s state or the weapon being used.
In short, there are 4 main counterparts in the animation system:
Animation Linked Interface- A shared protocol for the animation blueprints involved, it defines a common contract, for eachALIfunction, we can input something (Or usually nothing), and return out an animation poseAnimation Blueprint- The main logic that determines what state should we be in, and get one interface function from theALIto presume that the animation needed here will be injected some time in the future. This class constructed a logic framework and connects animations with a virtual hook point. It only cares about what arbitrary animation should be played at what time, without caring about the actual animation assets.Animation Linked Layer Base- The base class that actually implements eachALIinterface, but still doesn’t contain any animation assets, instead, all animation assets are variables. This class constructed a data binding flow, that binds the virtual hook point, to virtual animation assets. It only cares about what animation assets should be used per interface function, without caring about who would use it.Animation Linked Layer- The actual animation assets that are being injected into the character usedAnimation Blueprint. Since it inherits from theAnimation Linked Layer Base, there’s no need to implement any further logics, so think of it as a data container. This class provides all the data that theAnimLLBneeds, henceAnimLLBwould dynamically output an animation pose forAnimBPthroughALI, eventually feed back to theAnimBPand finally output to the skeleton mesh.
Sounds complicated but once you get the hang of it, it’s actually quite simple. The benefit of this approach is very obvious, want to add 20 types of weapons without letting an animation blueprint to load all the assets? Not felling like duplicating the same logic over and over again? Hate to debug animation and write error prone logic? Want multiple teammates to work together? Well this is the savior.
Animation Blueprint
From the reference chain we can see that this part is still the same as UE4, we have character BP, on which we would have some skeleton meshes, and then we references an anim bp as AnimInstance. So far so good.
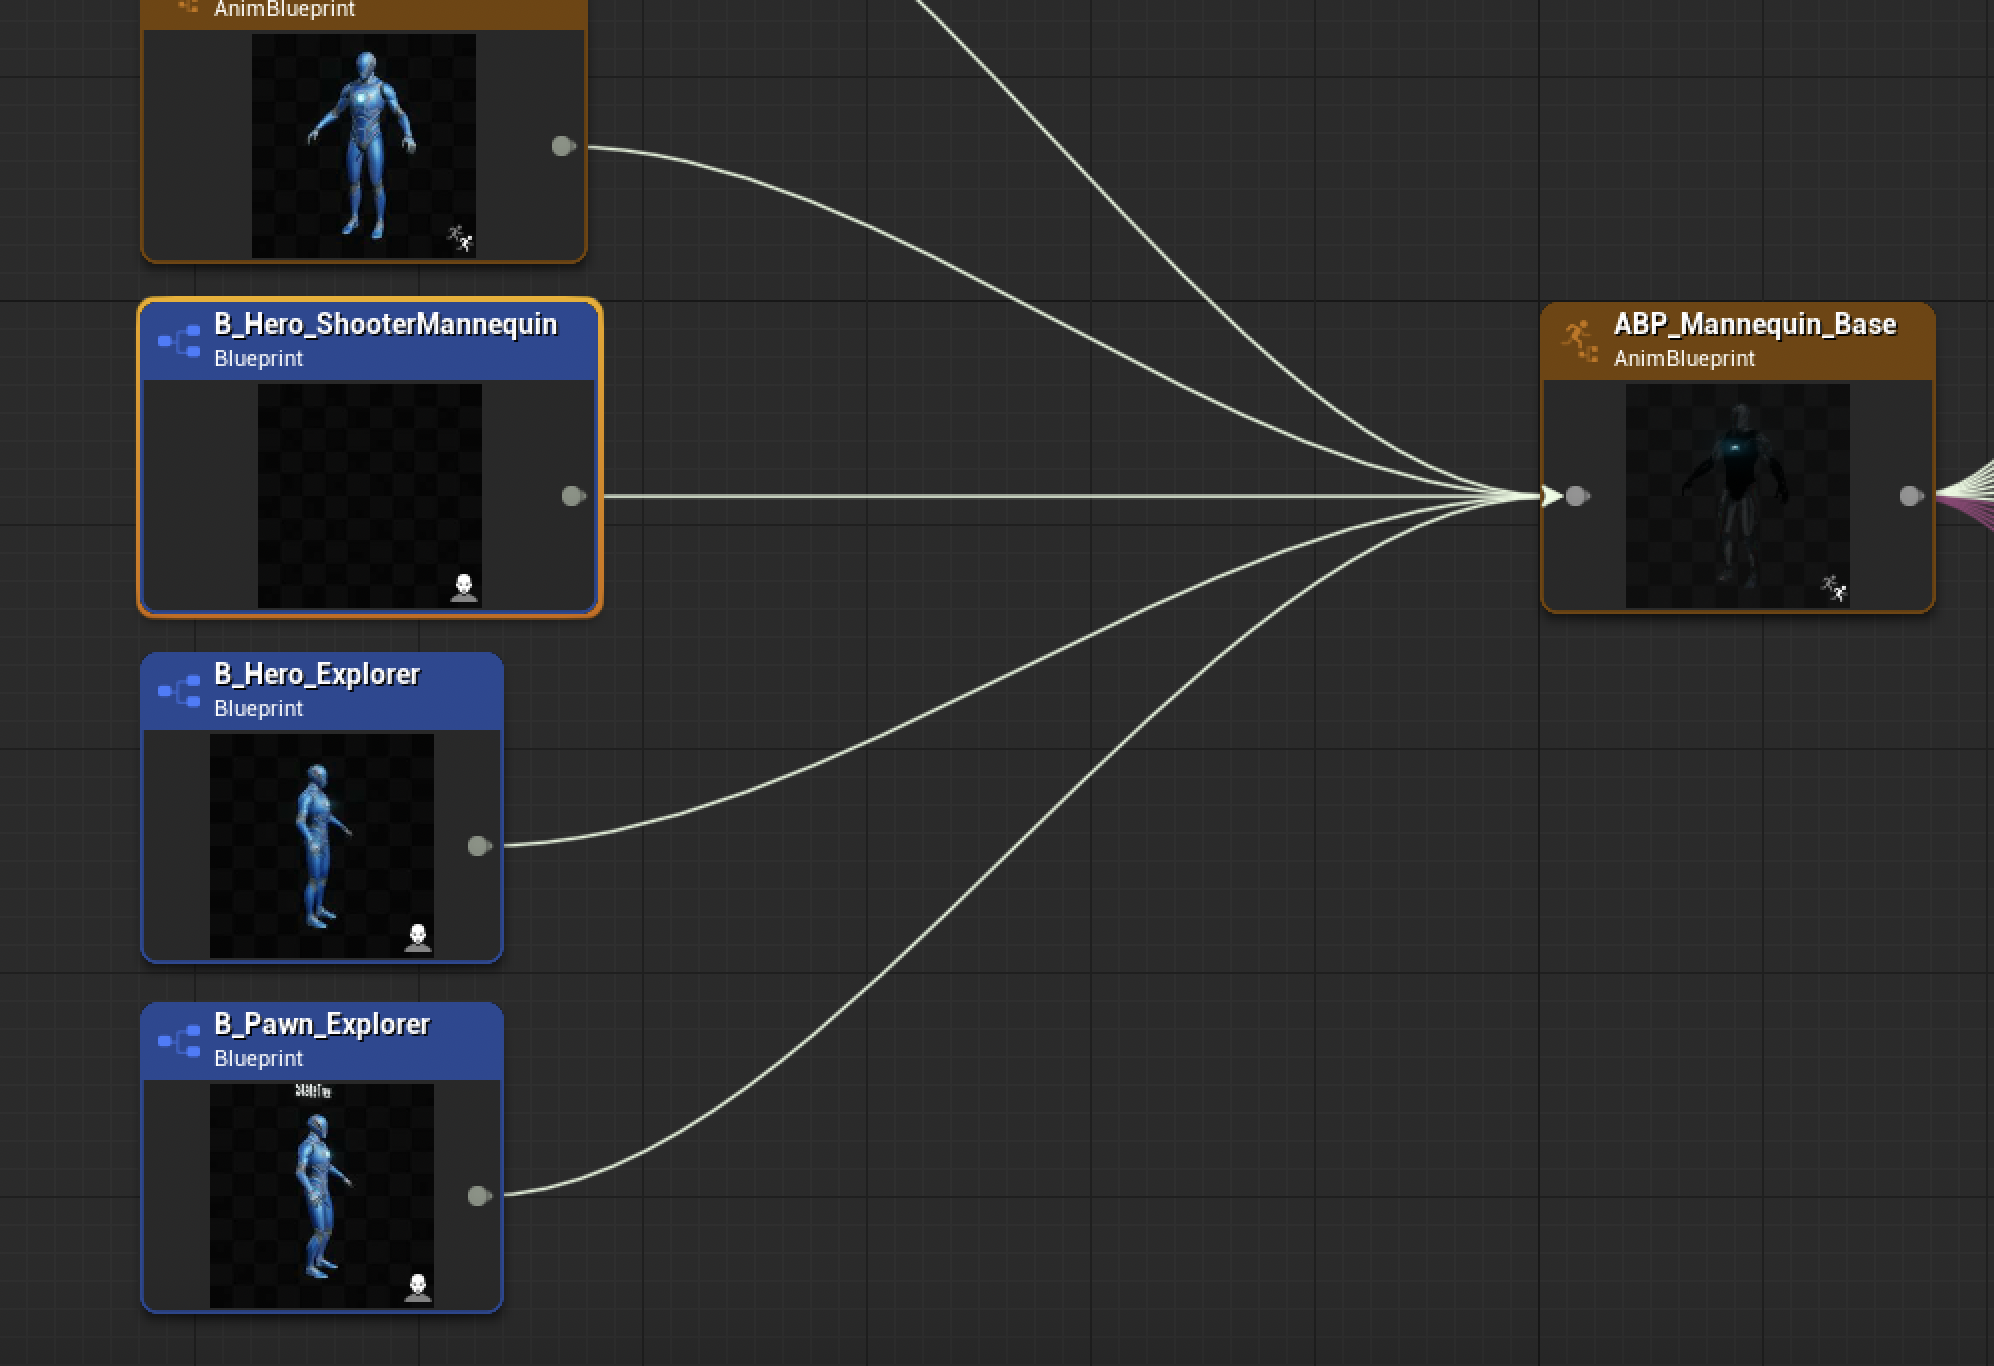
Inspecting the asset, the first thing we see is this is not a normal anim instance, but a class derived from LyraAnimInstance. We will cover what does it do later. 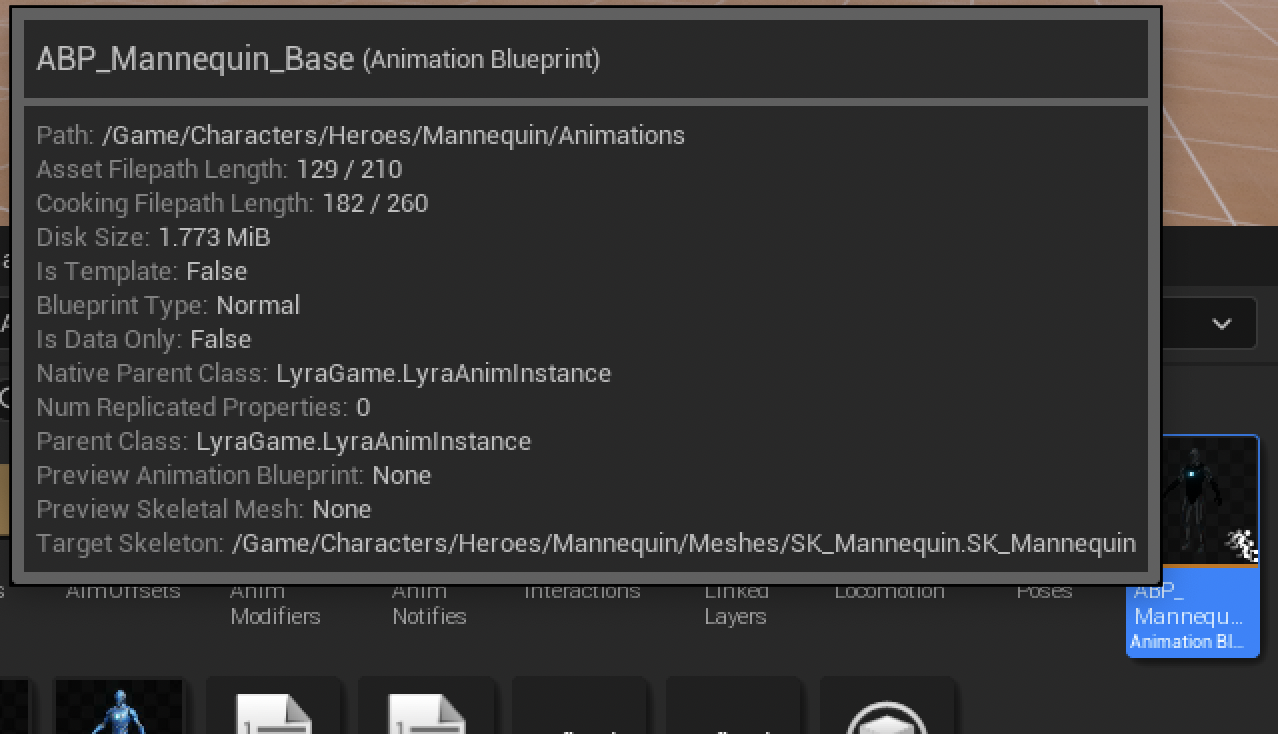
Animation Blueprint Structure
The class itself seems overwhelming, it kind of is. But let’s don’t lose our focus here and break it down step by step.
First thing first, an animation blueprint really just does one thing - Tell the controlled skeleton what to do at current frame. For each frame, it’s actually just outputting a pose. Which was calculated by a tons of logics, correction, IK, anim swapping, procedural operations, blah blah. Yet it doesn’t change it’s nature - An AnimGraph usually consists of a locomotion state machine, then after some pre-processing, some post-processing, some blending and mixing, etc. finally a final pose gets generated.
In order to have all these decisions (when to play what) to be made, we are constantly pulling data from our character, or even from the game itself.
Ultimately, we are trying to decide which pose should we playing now (in Anim Graph), based on the data we have (in Event Graph and/or functions).
To echo with the first section, we have mentioned that this class is merely a framework, it doesn’t contain any animation assets. The actual animation assets are being dynamically injected into the character used Animation Blueprint as an Animation Linked Layer. This allows for a modular approach to animation, where different layers can be swapped in and out depending on the character’s state or the weapon being used. In fact, here’s the comment left by Epic:
This Anim Graph does not reference any animations directly. It instead provides entry points for Montages and Linked Animation Layers to play poses at certain points in the graph. This graph’s main purpose is to blend those entry points together (e.g. blending upper and lower body poses together). This approach allows us to only load animations when they’re needed. For example, a weapon will hold references to the required Montages and Linked Animation Layers, so that data will only be loaded when the weapon is loaded. E.g. B_WeaponInstance_Shotgun holds references to Montages and Linked Animation Layers. That data will only be loaded when B_WeaponInstance_Shotgun is loaded. B_WeaponInstance_Base is responsible for linking animation layers for weapons.
If the reader was used to UE4 animation system, be ready, there’re quite some differences between the two engine versions. Since Animation system are well known for its CPU thirty nature, in order to leverage multithreading as much as possible, a bunch of practices used in Lyra Animation were coming from this post Animation Optimization, so it’s highly recommended to skim through that over first, otherwise the rest contents might be a bit hard to digest. Anyway, let’s begin exploring the anatomy of the AnimGraph:
AnimGraph
AnimGraph is the core of the animation blueprint, it defines the flow of the animation data and how it is processed. The AnimGraph is divided into several sections, each responsible for a specific part of the animation process.
Locomotion And Left Hand Override
The first part is locomotion, a state machine that handles the basic movement of the character, once we output a pose, it went into LeftHandPose_OverrideState and being cached for future usage.
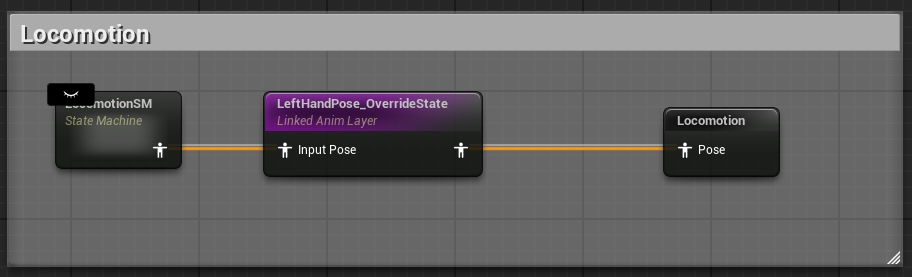
The LeftHandPose_OverrideState is an AnimationLinkedInterface, as mentioned before, it defines a shared protocol for the main animation blueprint and the linked animation layers, think of it as a hook, where we can plug in other animation assets, and the main logic will just take whatever is being plugged in. For more information about this, please refer to the official document Animation Linked Layer
Notice the
Flashicon on the node? This is aFast Pathnode, well explained in the Animation Optimization
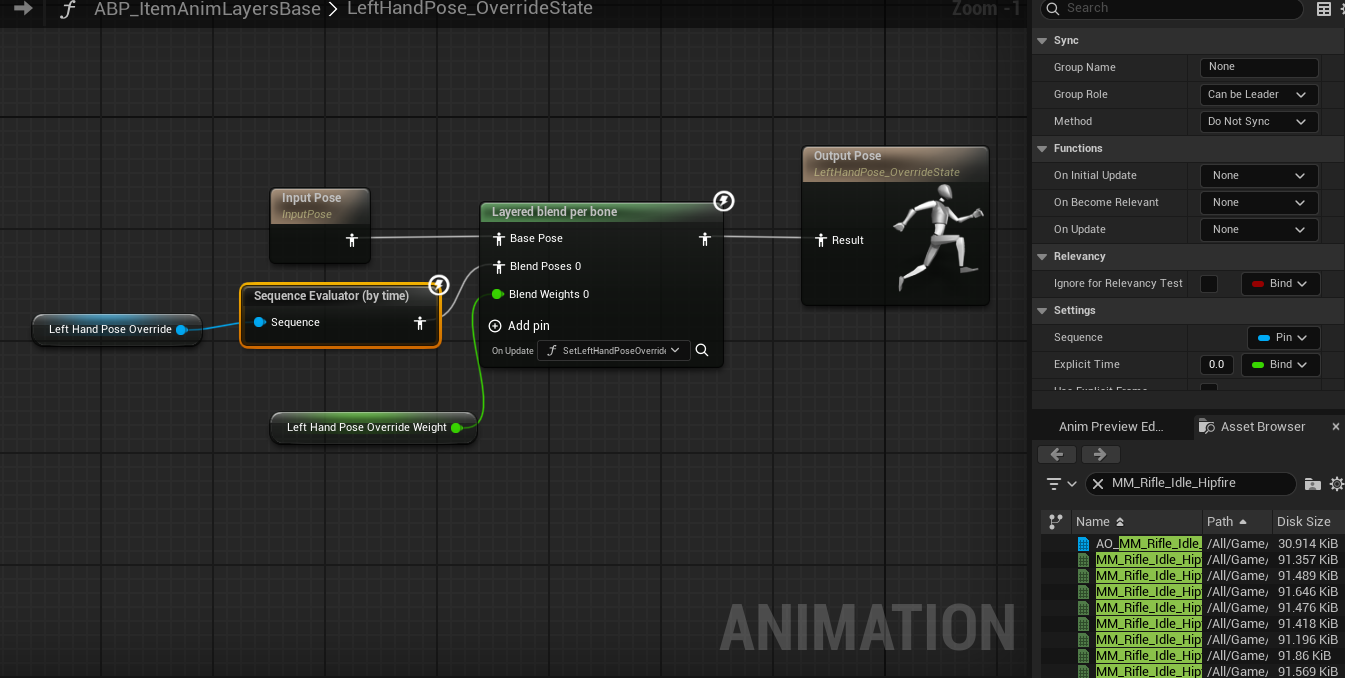
In the implementation, we can see that the pose from locomotion state machine is being blended with a left hand pose override variable, a SequenceEvaluator(ByTime) node is wired afterwards, with ExplicitTime set to 0, this means that we will just extract the first frame of that override animation. Then, both pose went through a LayeredBlendPerBone node. Which bone? All the left hand fingers.
To this point, we kinda know what is actually happening here, some weapons might have a different grip attachments, that when we snap our left hand to the weapon, few fingers might overlapping with the mesh (Like a Vertical Grip, Angled Forward Grip, etc). So we procedurally bend the fingers to match the weapon (attachment) mesh.
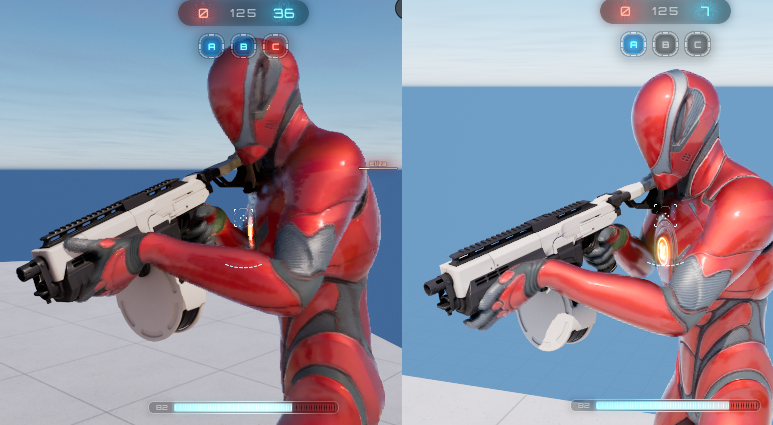
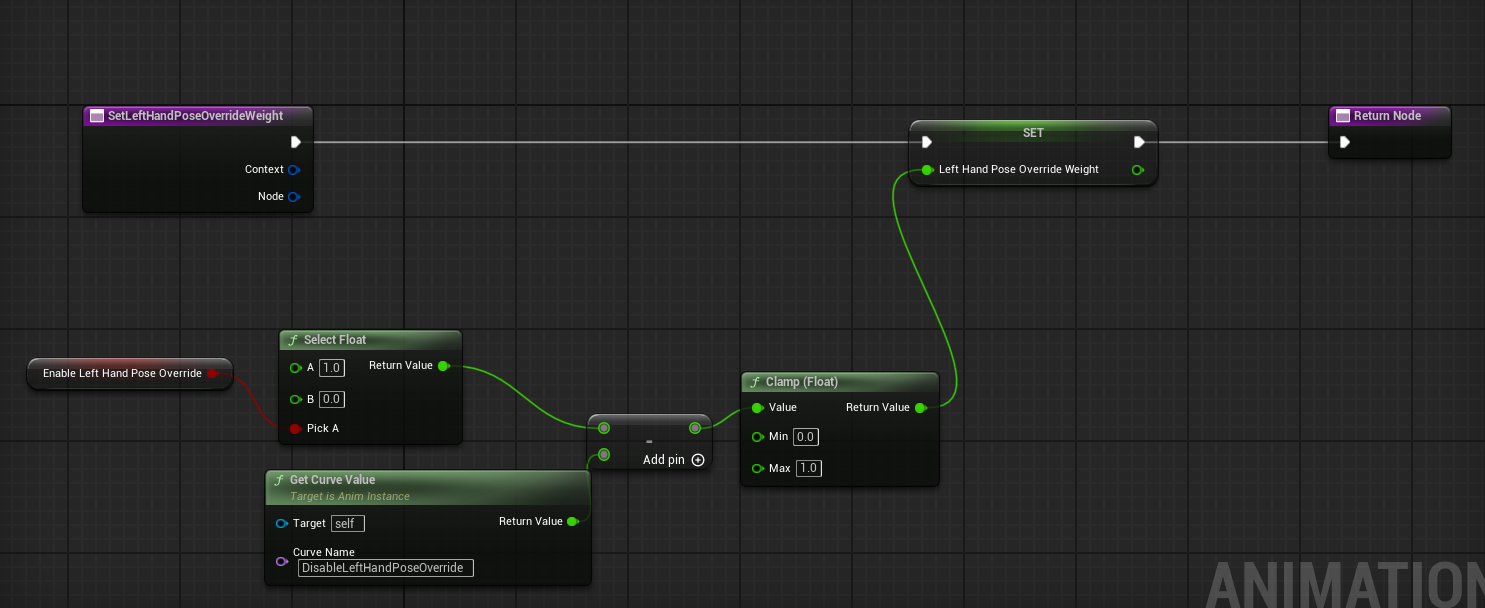
How much should we blend them? Well here we bind function SetLeftHandPoseOverrideWeight to the node, that will be called everytime this node updates. It’s not rocket science, basically just read a few variables set from the instance, who did it? Shotgun.
Upper/Lower Body Blend
Now that we have the locomotion base part out of the way, next step is to blend the upper and lower body together. The idea behind it is, there would be tons of montages gets played, they are exotic, often one shot that comes with gameplay abilities, etc. Problem is, we don’t want a montage to hijack our lower body animation, if we are running while shooting, we definitely want to keep running than sliding on the ground because an “Idle Shooting” montage is being played.
This is done by a LayeredBlendPerBone node as well, which allows us to blend different animation layers together based on the bone hierarchy. The LayeredBlendPerBone node takes in two poses, the upper body pose and the lower body pose, and blends them together based on the bone hierarchy.
There’re two types of Montage, additive and regular. Stuff like shooting are usually Additive (Full body additive), our locomotion would modify the whole body already, and upon whatever pose we have, we are just gonna add another shooting motion to it. In Lyra, firing is a FullBodyAdditivePreAim slot montage
And the other type is regular, just like fancy dance, it doesn’t really care where the player is looking at, as it will take over the skeleton. Emote dancing montage is at slot FullBody
Reloading and throwing grenade is a bit special, the montage have both UpperBody and UpperBodyAdditive slots.
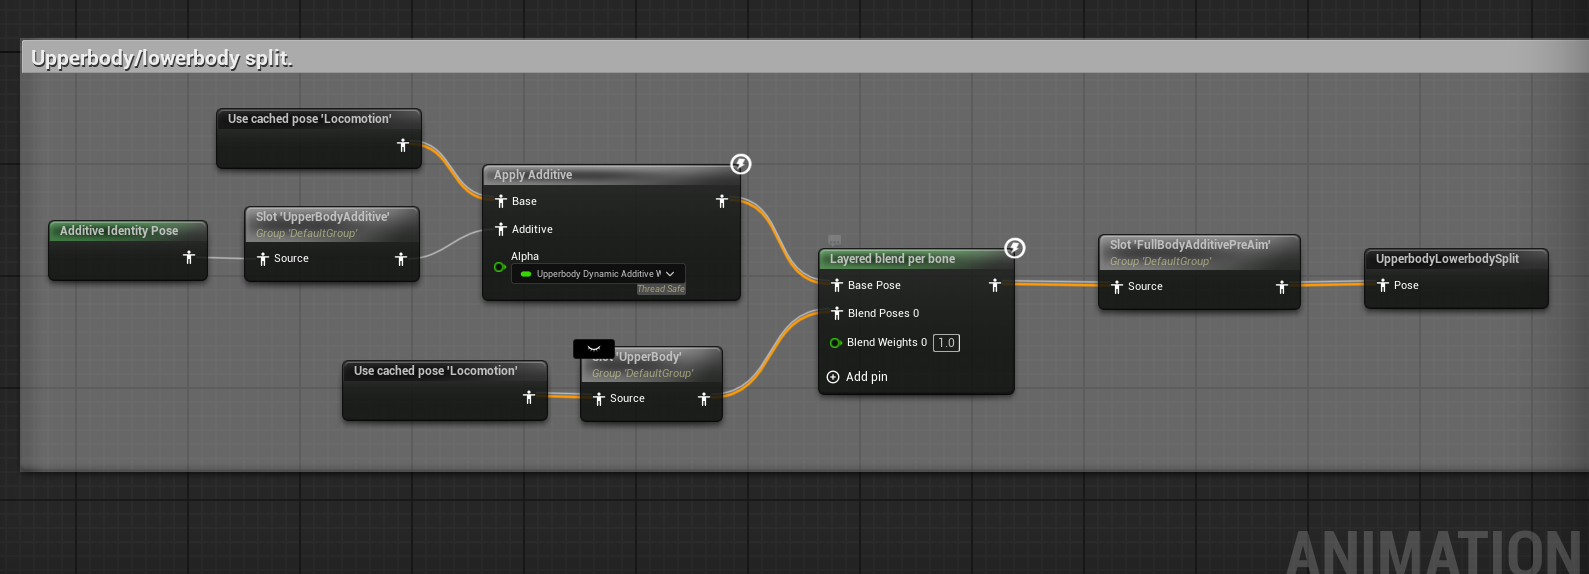
Additive Blend
With, first we took the cached Locomotion pose, and ApplyAdditive it with the slot UpperBodyAdditive. This is basically saying: “Hey, add whatever montage is being played on the upper body to the current locomotion pose”. Note we passed an AdditiveIdentityPose node in the slot, it just means if we don’t have anything to add, output the locomotion as it is, An identity pose will not change the pose it’s adding to.
But how much should they be blended, well, it’s controlled by the UpperbodyDynamicAdditiveWeight variable, and here’s the update logic:
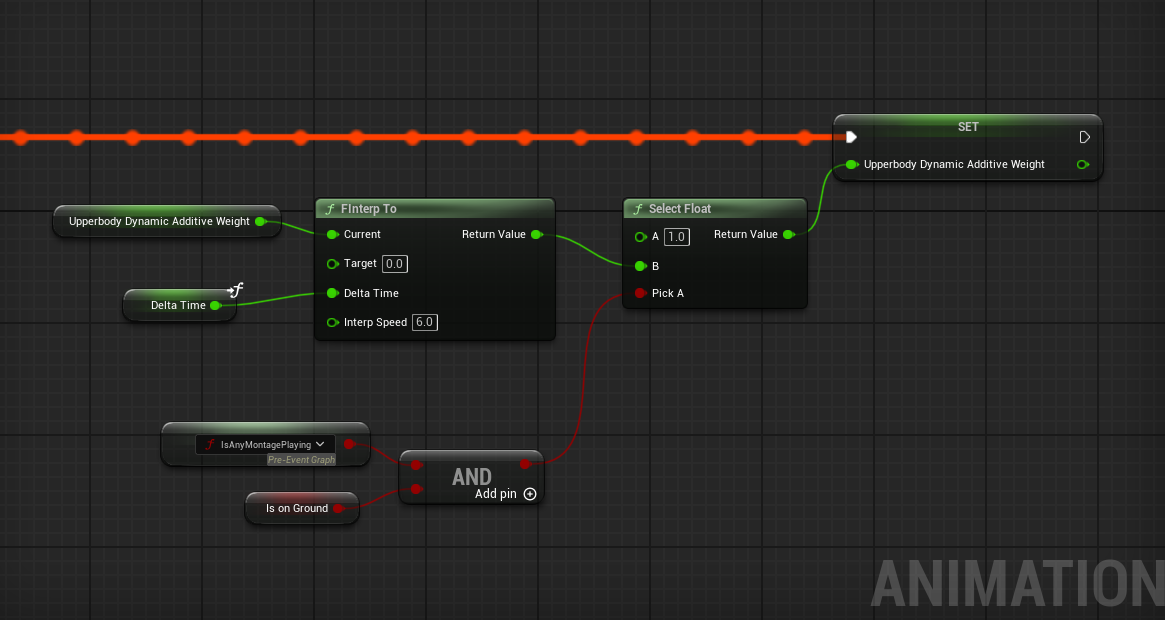
Basically, when we are playing any Montage on ground, the Montage would just be fully applied, otherwise, if we are jumping in air, then we will have a nice transition over to locomotion pose.
Regular Blend
For dancing animation, they are not additive, so we would just use a Slot node for Montages
As mentioned before, reloading has both UpperBody and UpperBodyAdditive slots
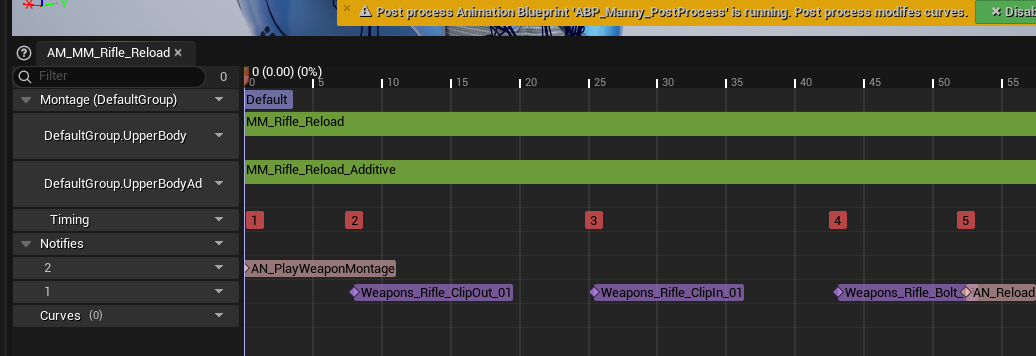
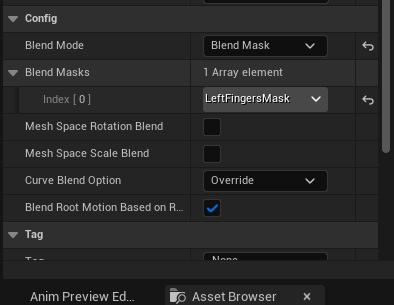
The UpperBody slot is used to play the reloading animation, while the UpperBodyAdditive slot is used to play the additive animation. However, if we look at the LayeredBlendPerBone node, we can see that the blend weight for the UpperBody slot is set to 1, so technically, the UpperBodyAdditive slot is not being used at all?Then what’s the whole point of having them there? The answer is, the blend weight here does not mean that every bone is using blend pose 0, because we also have a thing called Blend Profile, which is a profile that defines how the blend weight is applied to each bone in the hierarchy. This allows us to have different blend weights for different bones, so we can have more control over how the animation is blended.
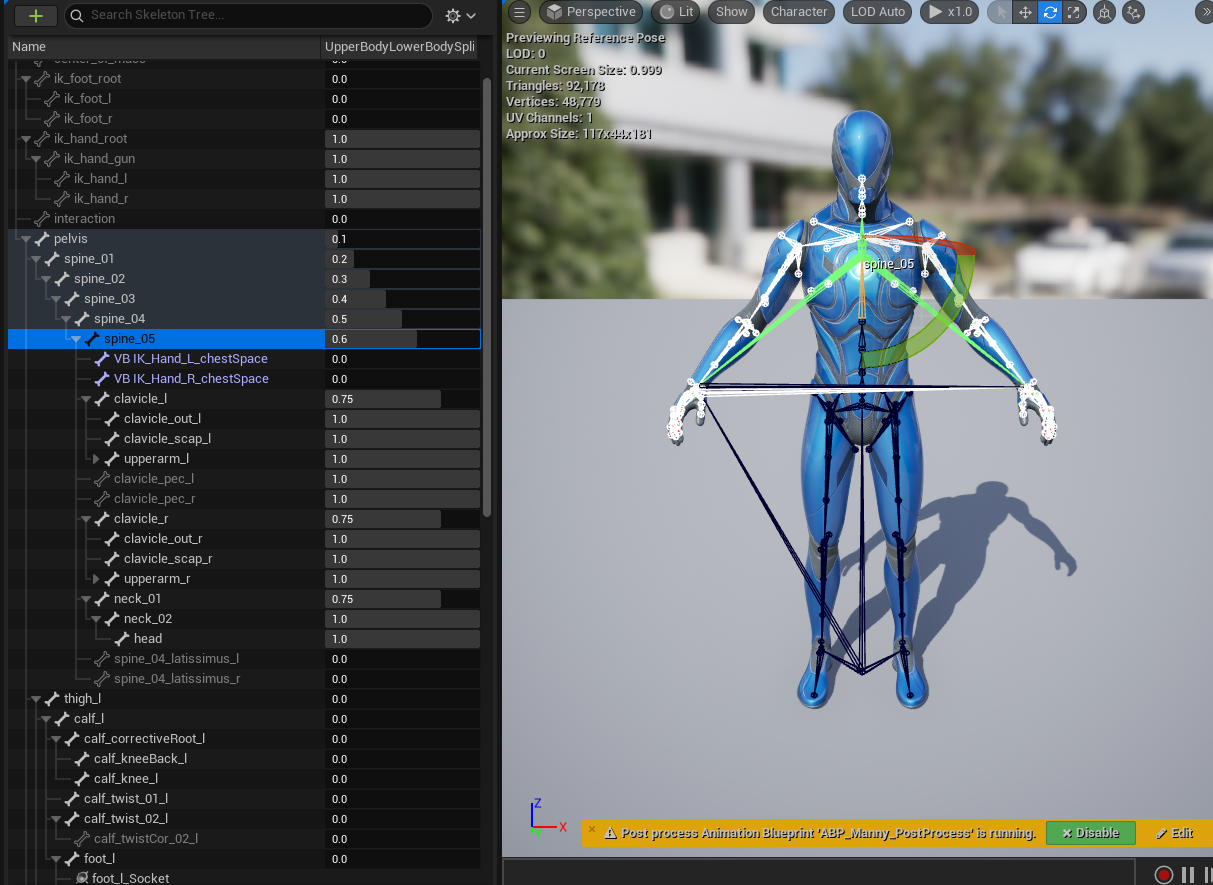
Blend Profile
As can be seen from the image, there’s a nice transition from Spine1 all the way up to the Arm bones, the weight gradually climbs up to 1, so for those bones that doesn’t have full weights, they will still blend with the Additive pose.
FullBodyAdditivePreAim
We have split UpperBody slot out, blend back with Locomotion pose, then Lyra sent everything to another slot FullBodyAdditivePreAim. This is for all the firing animations, as well as weapon recoil, etc. This is done by having an AnimNotify along with the firing animation, and players another Montage on top of the FullBodyAdditivePreAim slot.

Caching UpperBodyLowerBodySplit
Finally, this gets cached to UpperBodyLowerBodySplit node.
Although we did mentioned firing, but from the above image we know that this part is mostly dealing with Grenade and Reloading, as these are the only montages using UpperBody related slots.
Aiming, Fullbody Additive and Fullbody Montage
Only a few things left! Now we need to deal with Aiming. It’s quite easy to realize that Aiming is going to be different for different weapons (Imaging aiming a Desert Eagle like a sniper rifle, we’ve just created some goofy concepts…) Anything bind to specific type of weapon should go to AnimLinkedLayer, and this is exactly what happens here - an ALI hook.
Next we have Fullbody Additive, which is another LinkedLayer, this is for jump recovery animations, like holding a pistol would have different jump recovery animation than holding a shotgun.
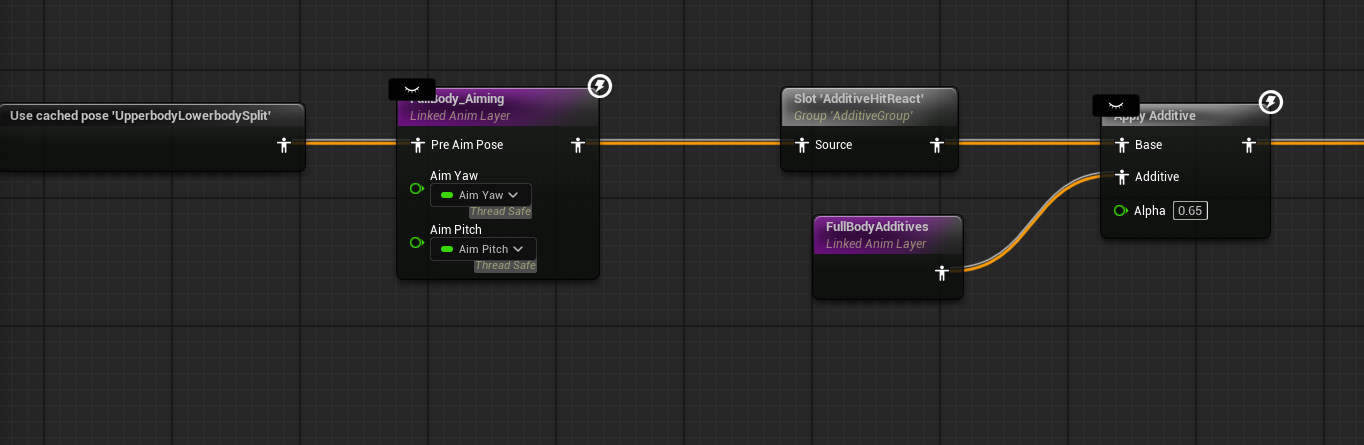
Finally we have FullBody Montage slot. That’s for the dashing ability, where the player can dash to any direction.
Inertialization and Turn In Place
Almost there! Next we have Inertialization, a per bone blend node to smooth two different poses transition, it’s a common practice to use after processed all the animation data, so here we put it at the end of the graph (sort of).
Turn in place is another common practice to solve foot sliding. Here’s the comment left by Epic:
When the Pawn owner rotates, the mesh component rotates with it, which causes the feet to slide. Here we counter the character’s rotation to keep the feet planted.

Procedural Fixup - Hand Leg and Foot
Same old, we are calling an AnimLinkedLayer to deal with per weapon IK fixup for hand, because different weapons might have different IK alpha for hands. We also need to place our foot on the ground, so two parts here:
DisableHandIKRetargeting
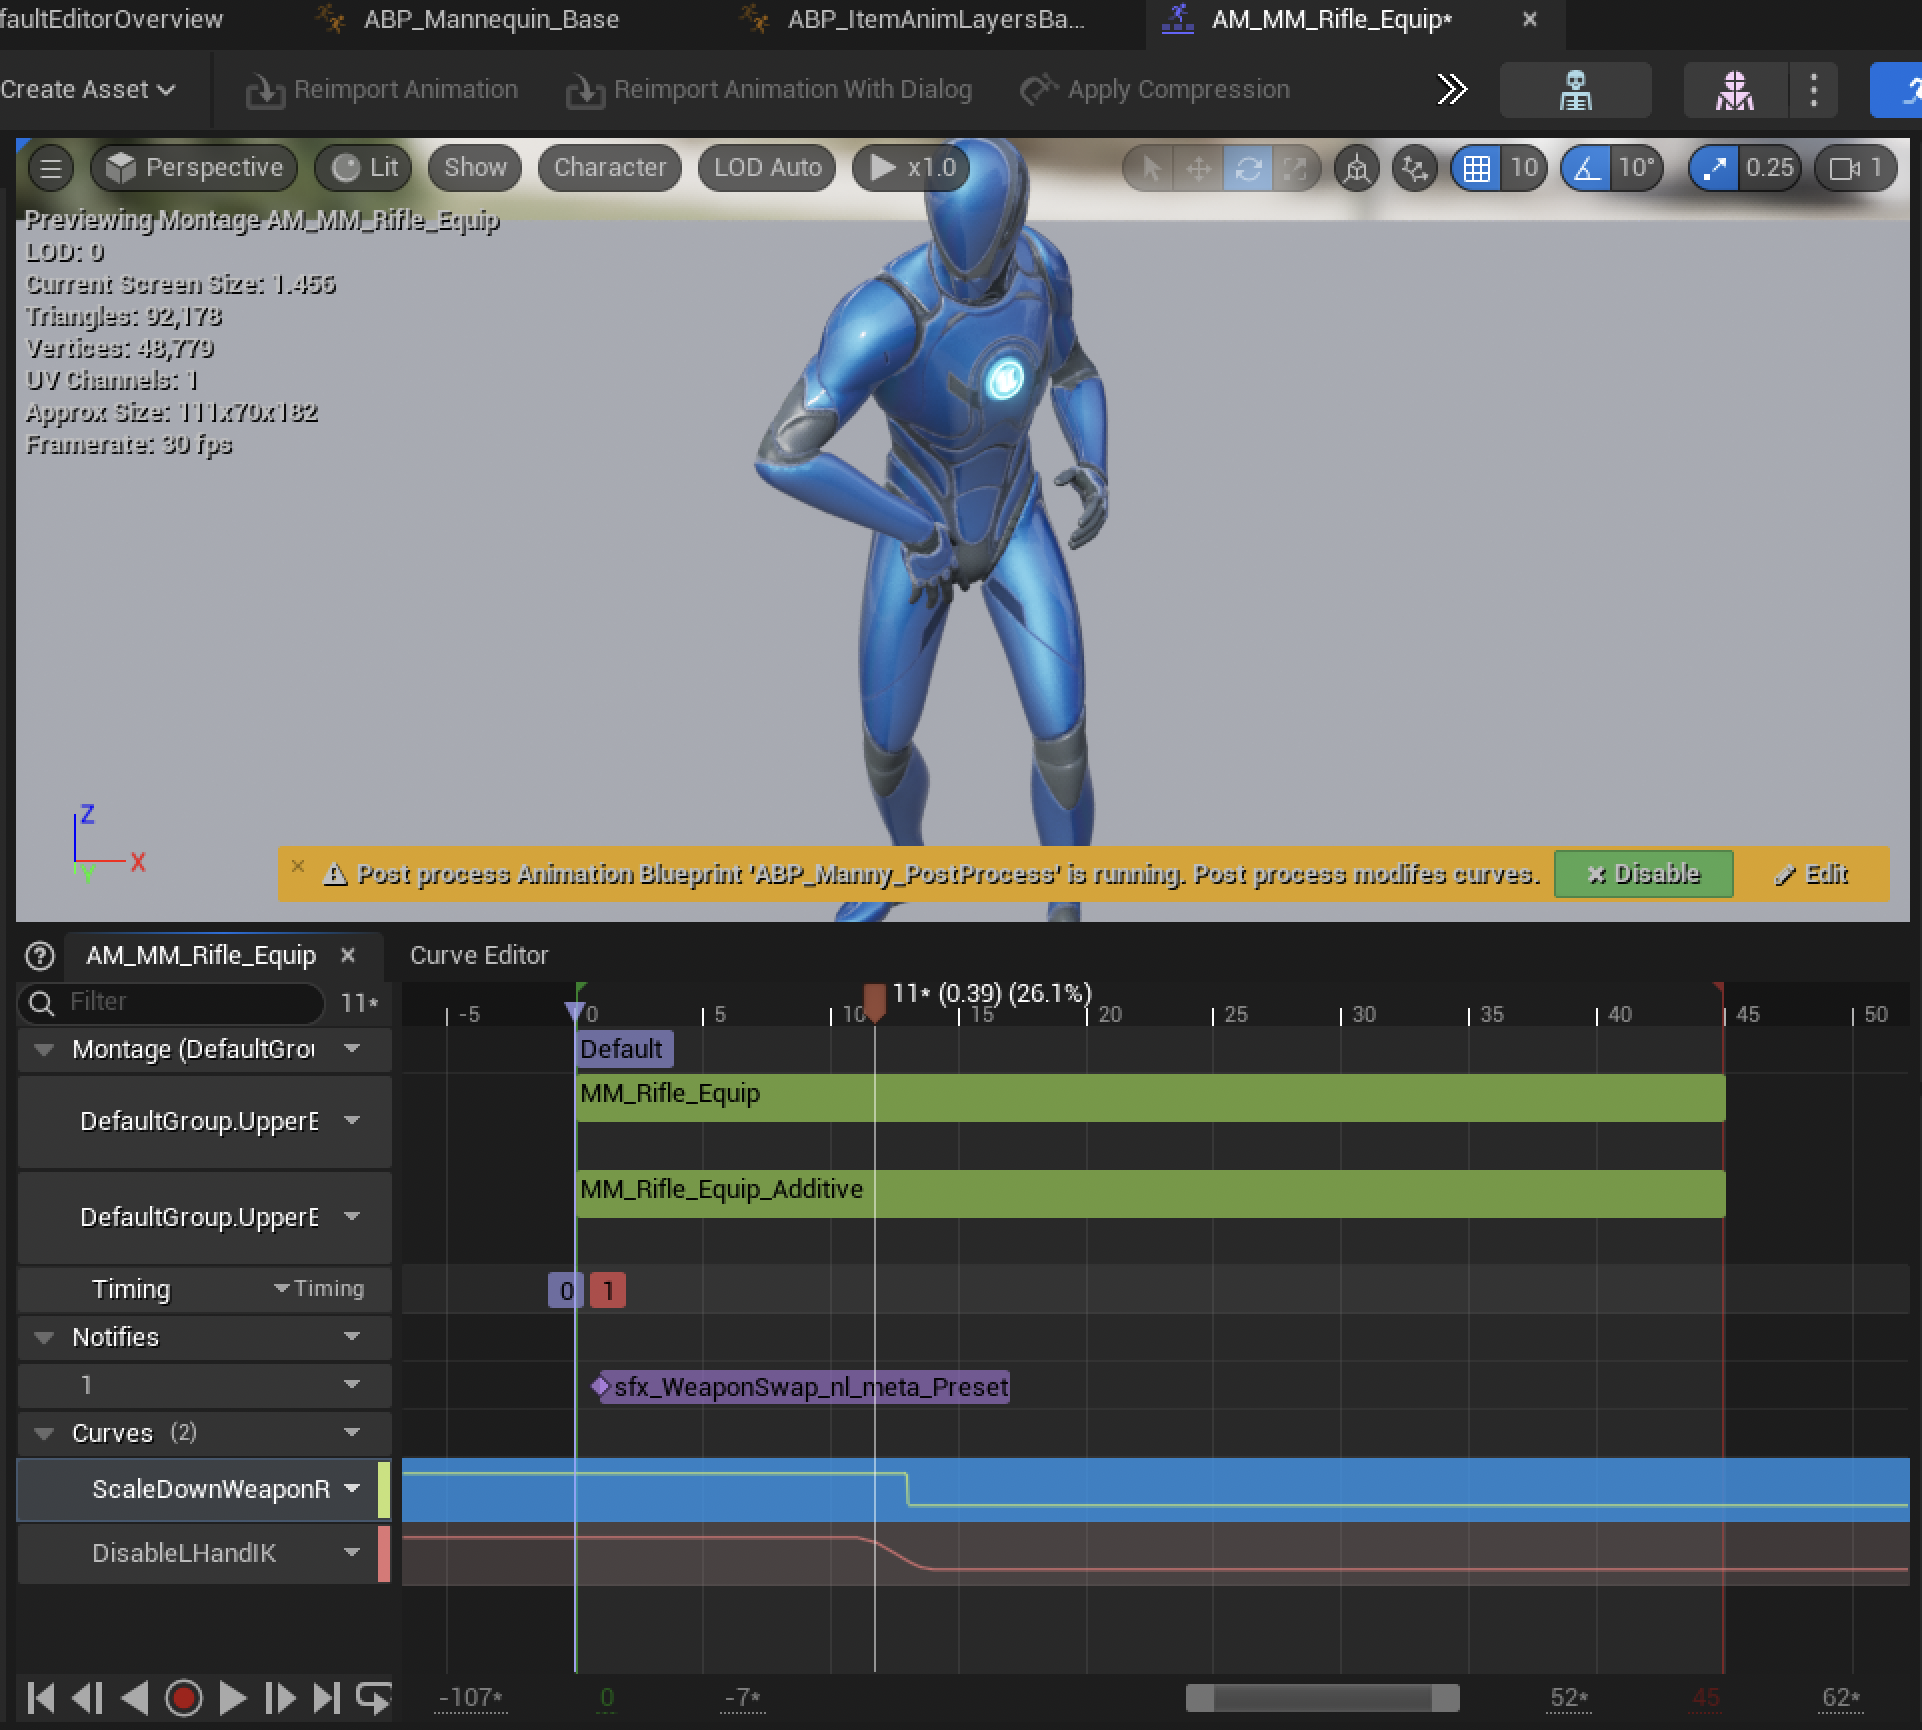
First part is DisableHandIKRetargeting, it’s a curve that allow temporary disable both hand IKs, although I didn’t find any montage using this, it could be useful to override the hand IK at a global level.
DisableLHandIK and DisableRHandIK
The second part is DisableLHandIK, and DisableRHandIK, these are usually used for equipment and unequipment animations. It can also be used in pistol melee animation, where the character would just smash the enemy with one hand holding the gun.
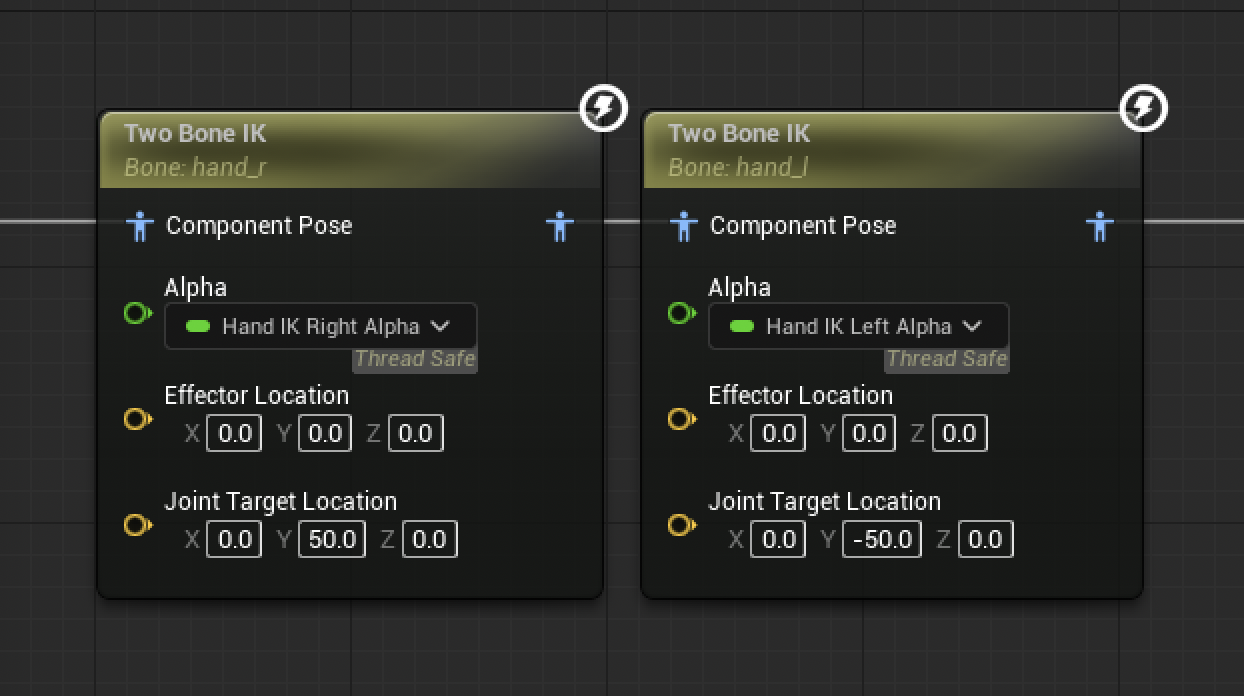
These values will be read from the curve, and then get’s updated to HandIKLeftAlpha and HandIKRightAlpha variables. Eventually drive each side IK with TwoBoneIK node.
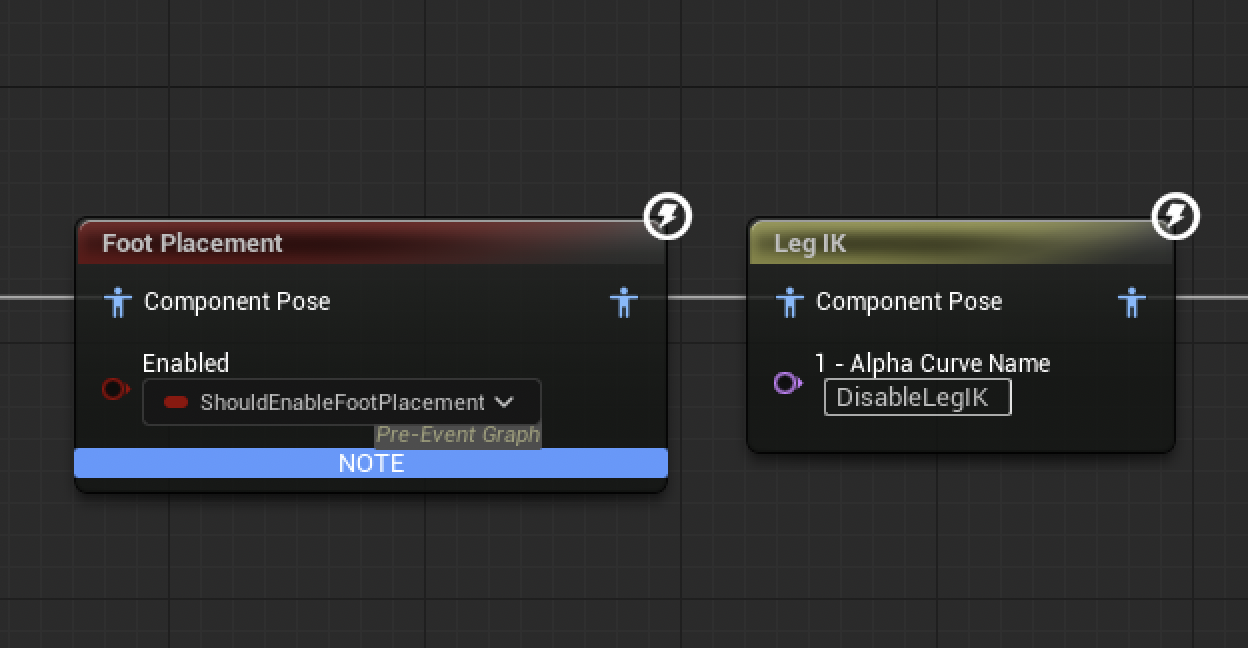
Foot Placement & DisableLegIK
Next we need to resolve the foot placement, this is done by a FootPlacement node. This node will take in the current foot position and the ground normal, and then calculate the new foot position based on the ground normal. This is useful for when the character is walking on uneven terrain, as it will ensure that the feet are always planted on the ground.
Then, we have DisableLegIK, this is a curve that used in the dash animations, where the player will dashing in air, hence we don’t want to apply any leg IKs.
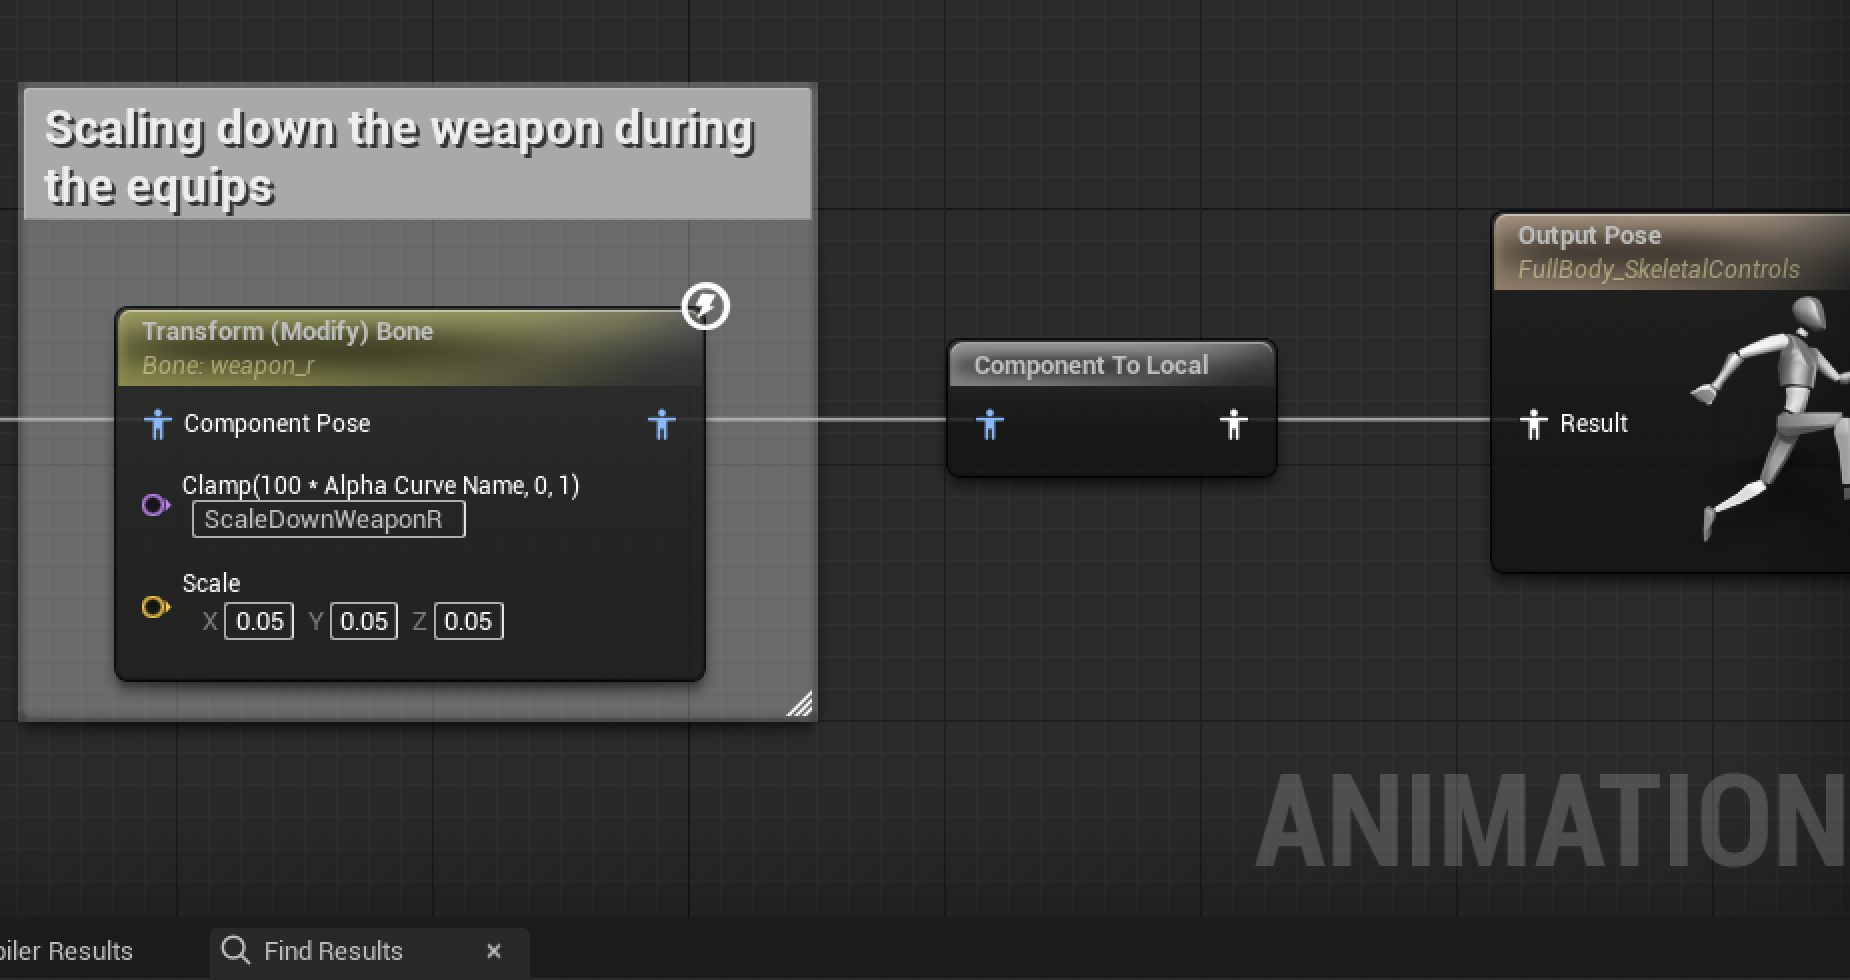
Scaling Down Weapon
The final piece is ScalingDownWeapon, this is a curve that used in the equipment animation, where when the player unholstered the weapon, it’s actually being scaling down to 0. I would doubt if this is a best practice, but it does the work so…
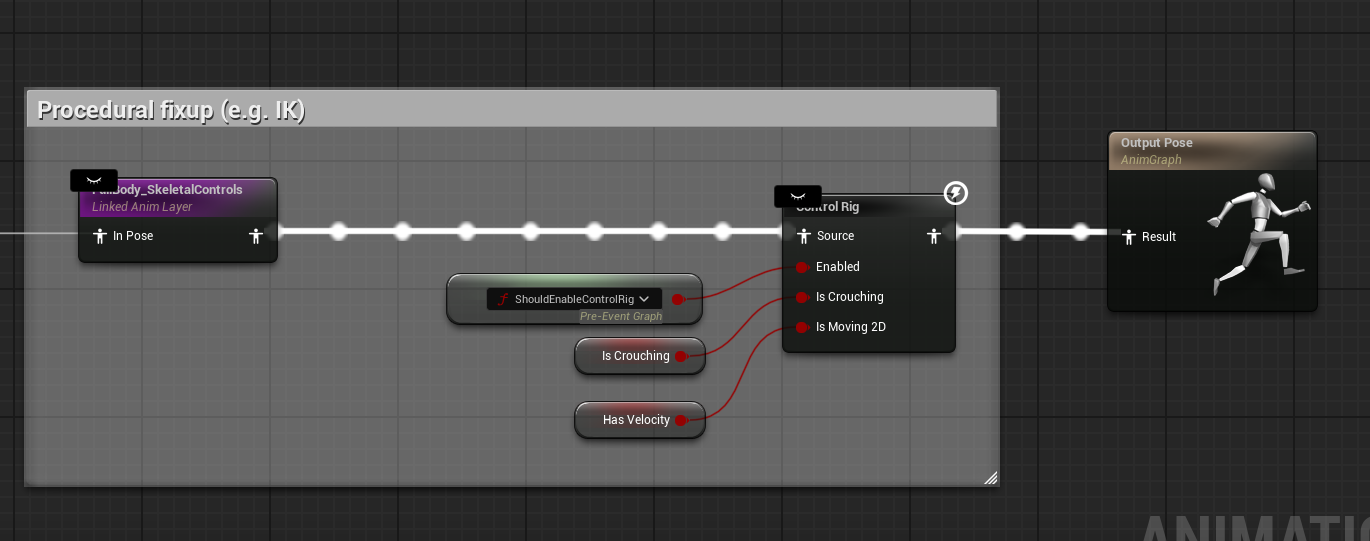
Procedural Fixup - Knee
We calls into control rig to mainly fix the knee from intersecting with the torso when we are crouching at a slope. Aaaaand done! This is a sneak peak of the mere “Animation Framework” (I know, AAA game has an insane amount of complexity)
Locomotion State Machine
Now let’s step inside the Locomotion state machine, Epic left a comment here:
This state machine handles the transitions between high level character states. The behavior of each state is mostly handled by the layers in ABP_ItemAnimLayersBase.
We will skip on what and how to use it, because it’s pretty much the same as UE4, an official document is available here Animation State Machine
In general, the state machine authors two parts, movement and jumping.
Movement
Upon entry, we start in Idle state:
Idle State
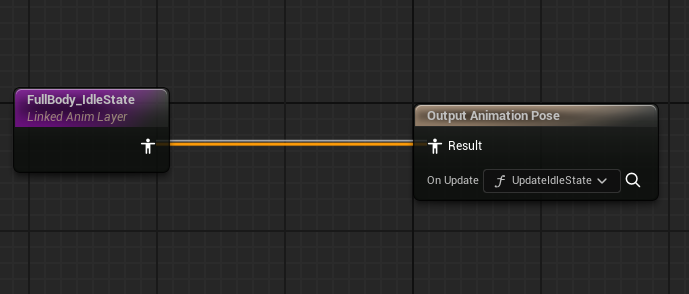
Feed ALI_ItemAnimLayers - FullBody_IdleState while calls UpdateIdleState on updating state
Idle -> Start
Idle- Enter
Startstate- If
HasAccelerationOR(GameplayTag_IsMelee AND HasVelocity)
- If
- Enter
Idle will transit to Start state if we have acceleration or if we are meleeing and has velocity.
Start State
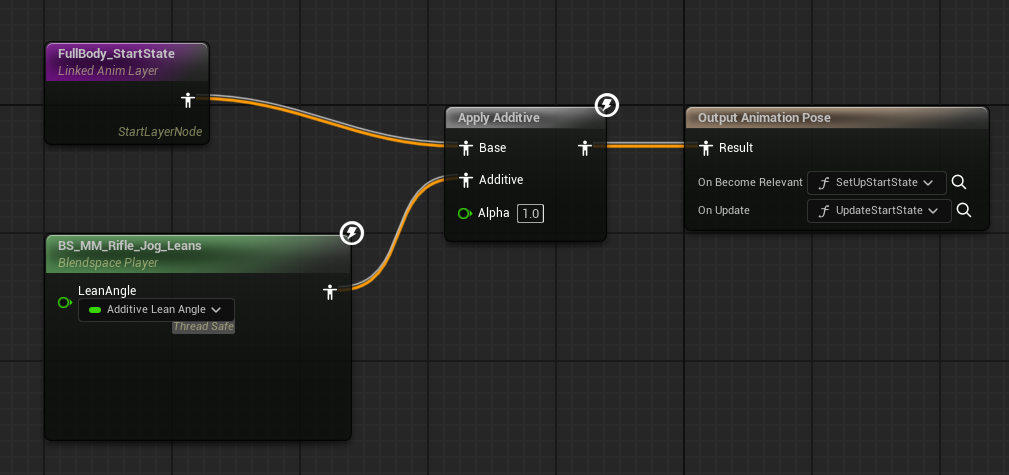
Applies BS_MM_Rifle_Jog_Leans with AdditiveLeanAngle as addtive pose to ALI_ItemAnimLayers - FullBody_StartState, calls SetUpStartState on BecomeRelevant and UpdateStartState on updating state.
The BecomeRelevant can be considered as a OnBeginPlay, there’s also a OnInitialUpdate which can be considered as OnPreBeginPlay.
We applied a Lean animation, so that the character will lean to one side to achieve a realistic look.
Start -> Cycle/Stop
Start- Enter
Cyclestate- If
Abs(RootYawOffset)> 60 (Priority 1) - Or
LinkedLayerChanged(Priority 1) - Or
AutomaticRule(Priority 2) - Or
(StartDirection != LocalVelocityDirection)ORCrouchStateChangeORADSStateChangedOR(CurrentStateTime(LocomotionSM) > 0.15 AND DisplacementSpeed < 10.0)
- If
- Enter
Stopstate (Priority 3)- If !(
HasAccelerationOR(GameplayTag_IsMelee AND HasVelocity))
- If !(
- Enter
Start can transit to Cycle or Stop state, notice that we have different priorities here, for each transition condition, we can have granular control over how the transition should be made, for example, change the transition duration or blend logic.
The AutomaticeRule ensures that we won’t stuck in the Start state indefinitely, there’s always a place to go.
We also noticed some transitions are dark red, this means they share the same conditions, this is a way to create sharable conditions for better maintainability.
Cycle State
Applies BS_MM_Rifle_Jog_Leans with AdditiveLeanAngle as addtive pose to ALI_ItemAnimLayers - FullBody_CycleState, so the leaning effect can be preserved across the whole locomotion state.

Cycle -> Stop
Cycle- Enter
Stopstate- If !(
HasAccelerationOR(GameplayTag_IsMelee AND HasVelocity))
- If !(
- Enter
Nothing fancy here, reused the shared condition from Start to Stop.
Stop State
Feed ALI_ItemAnimLayers - FullBody_StopState while calls UpdateStopState on updating state

Stop -> Start/Idle
Stop- Enter
Startstate- If
HasAcceleration
- If
- Enter
Idlestate- Or
LinkedLayerChanged(Priority 1) - Or
CrouchStateChangeORADSStateChanged(Priority 2) - Or
AutomaticRule(Priority 3)
- Or
- Enter
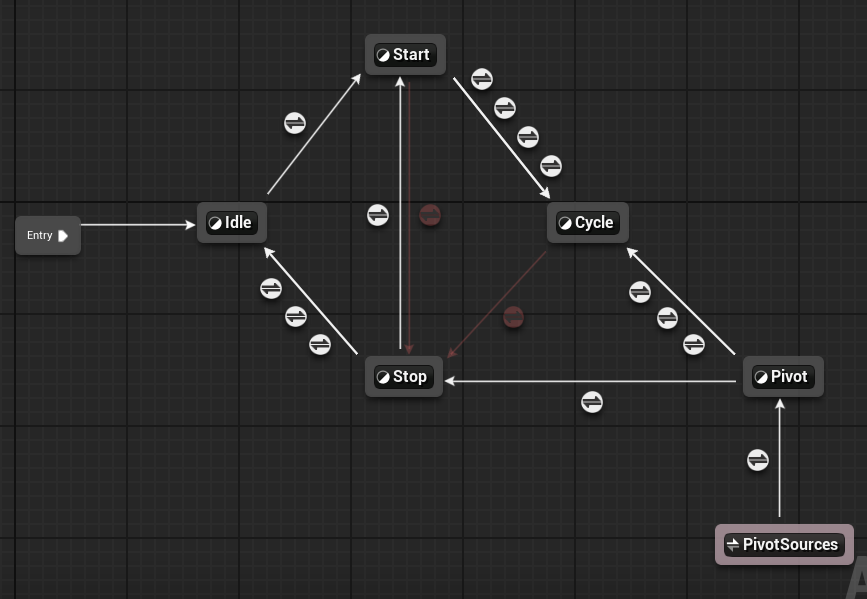
Same as before, the AutomaticeRule is here to ensure we won’t stuck in the stop state. So far, we have modeled the basic locomotion in a structure if Idle -> Start -> Cycle -> Stop -> Idle, easy to understand.
PivotSources -> Pivot
PivotSources- Enter
Pivotstate- If ((
LocalVelocity2DdotLocalAcceleration2D) < 0.0) AND !IsRunningIntoWall
- If ((
- Enter
The PivotSources is a State Alias, it is just a representation of the Start and Cycle state.
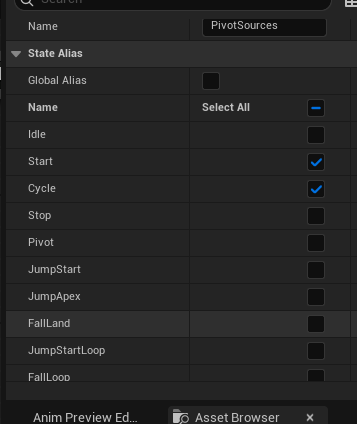
This is used to blend a drastic change in direction (Opposite direction).
Just a side note here, the way the editor dynamically querys all the user created states and showing it in details panel is not a common variable, but a customized editor slate.
1
2
3
4
5
6
7
8
9
10
11
12
13
14
15
16
17
18
19
20
21
22
23
24
25
26
27
28
29
30
31
32
33
34
35
36
37
38
39
40
41
42
43
44
45
46
47
48
49
50
51
52
53
54
55
56
57
58
59
60
61
62
63
64
65
66
67
68
69
70
71
72
73
74
75
76
77
78
79
80
81
82
83
84
void FAnimStateAliasNodeDetails::GenerateStatePickerDetails(UAnimStateAliasNode& AliasNode, IDetailLayoutBuilder& DetailBuilder)
{
    ReferenceableStates.Reset();
    GetReferenceableStates(AliasNode, ReferenceableStates);

    if (ReferenceableStates.Num() > 0)
    {
        IDetailCategoryBuilder& CategoryBuilder = DetailBuilder.EditCategory(FName(TEXT("State Alias")));
        CategoryBuilder.AddProperty(GET_MEMBER_NAME_CHECKED(UAnimStateAliasNode, bGlobalAlias));

        FDetailWidgetRow& HeaderWidgetRow = CategoryBuilder.AddCustomRow(LOCTEXT("SelectAll", "Select All"));

        HeaderWidgetRow.NameContent()
            [
                SNew(STextBlock)
                .Text(LOCTEXT("StateName", "Name"))
                .Font(IDetailLayoutBuilder::GetDetailFontBold())
            ];

        HeaderWidgetRow.ValueContent()
            [
                SNew(SHorizontalBox)
                + SHorizontalBox::Slot()
                .AutoWidth()
                .VAlign(VAlign_Center)
                [
                    SNew(STextBlock)
                    .Text(LOCTEXT("SelectAllStatesPropertyValue", "Select All"))
                    .Font(IDetailLayoutBuilder::GetDetailFontBold())
                ]
                + SHorizontalBox::Slot()
                .FillWidth(1.0f)
                .HAlign(HAlign_Right)
                .VAlign(VAlign_Center)
                [
                    SNew(SCheckBox)
                    .IsChecked(this, &FAnimStateAliasNodeDetails::AreAllStatesAliased)
                    .OnCheckStateChanged(this, &FAnimStateAliasNodeDetails::OnPropertyAliasAllStatesCheckboxChanged)
                    .IsEnabled_Lambda([this]() -> bool
                        {
                            return !IsGlobalAlias();
                        })
                ]
            ];

        for (auto StateIt = ReferenceableStates.CreateConstIterator(); StateIt; ++StateIt)
        {
            const TWeakObjectPtr<UAnimStateNodeBase>& StateNodeWeak = *StateIt;
            if (const UAnimStateNodeBase* StateNode = StateNodeWeak.Get())
            {
                FString StateName = StateNode->GetStateName();
                FText StateText = FText::FromString(StateName);

                FDetailWidgetRow& PropertyWidgetRow = CategoryBuilder.AddCustomRow(StateText);

                PropertyWidgetRow.NameContent()
                    [
                        SNew(STextBlock)
                        .Text(StateText)
                        .ToolTipText(StateText)
                        .Font(IDetailLayoutBuilder::GetDetailFont())
                    ];

                PropertyWidgetRow.ValueContent()
                    [
                        SNew(SHorizontalBox)
                        + SHorizontalBox::Slot()
                        .FillWidth(1.0f)
                        .HAlign(HAlign_Right)
                        .VAlign(VAlign_Center)
                        [
                            SNew(SCheckBox)
                            .IsChecked(this, &FAnimStateAliasNodeDetails::IsStateAliased, StateNodeWeak)
                            .OnCheckStateChanged(this, &FAnimStateAliasNodeDetails::OnPropertyIsStateAliasedCheckboxChanged, StateNodeWeak)
                            .IsEnabled_Lambda([this]() -> bool
                                {
                                return !IsGlobalAlias();
                                })
                        ]
                    ];
            }
        }
    }
}
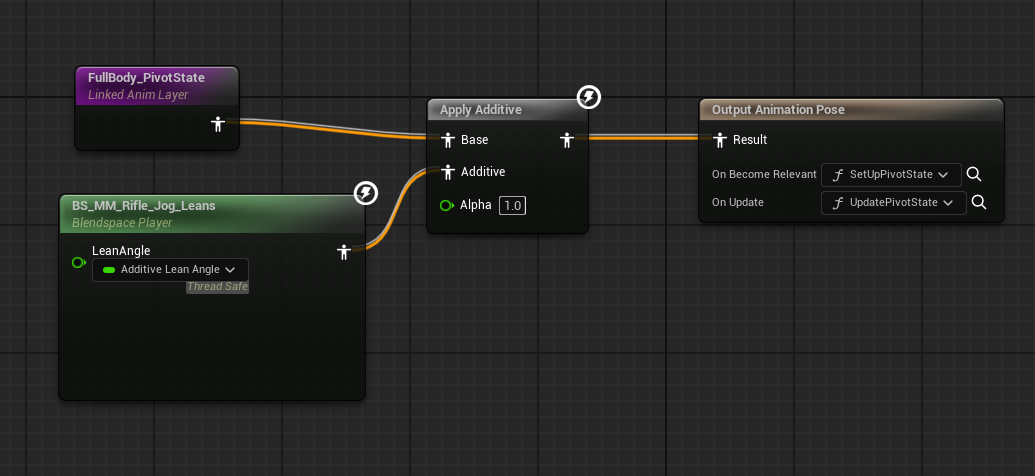
Pivot State
Applies BS_MM_Rifle_Jog_Leans with AdditiveLeanAngle as addtive pose to ALI_ItemAnimLayers - FullBody_PivotState, calls SetUpPivotState on BecomeRelevant and UpdatePivotState on updating state.
Pivot -> Cycle/Stop
Pivot- Enter
Cyclestate- If
LinkedLayerChanged(Priority 1) - Or
WasAnimNotifyStateActiveInSourceState(TransitionToLocomotion)(Priority 2) - Or
CrouchStateChangeORADSStateChangedOR (IsMovingPerpendicularToInitialPivorAND (LastPivotTime <= 0.0)) (Priority 3)
- If
- Enter
Stopstate- If !
HasAcceleration
- If !
- Enter
So basically, if we are doing a drastic change in opposite direction, we will enter Pivot state, and if we stopped immediately, it immediately stops and drops the fancy transition otherwise we will feel the control clunky. Or if we changed the moving direction to a perpendicular direction, we will enter Cycle state. The transition only being kept if we continue moving in the opposite direction.
Jumping
The second part is Jumping, which models the jumping and falling by a time based state machine. JumpStart -> JumpStartLoop -> JumpApex -> FallLoop -> FallLand -> EndInAir.

Jump Sources
A StateAlias of all states in Movement part, meaning any states can enter the jump state.
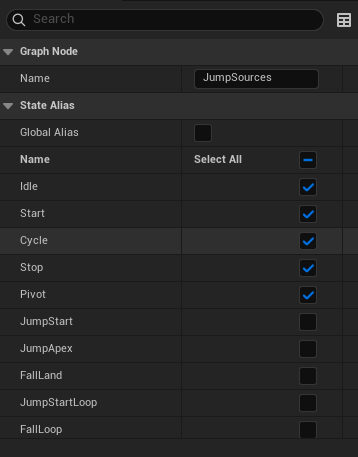
JumpSources -> JumpSelector
JumpSources- Enter
JumpSelectorstate- If
True
- If
- Enter
Right, this means it’s always transitioning to JumpSelector, why this is allowed? See below:
JumpSelector Conduit
JumpSelector is not a state but a conduit, which means it doesn’t have any animation associated with it. It is used to control the flow of the state machine and can be used to transition between different states.
JumpSelector -> JumpStart/JumpApex
The actual logic of switching to Jump States lands in here
JumpSelector- Enter
JumpStartstate- If
IsJumping
- If
- Enter
JumpApexstate- If
IsFalling
- If
- Enter
Easy to understand, if we pressed a jump key, we will enter JumpStart and follow a parabola curve (We will reach apex height later), but if we accidentally fall off a cliff, then we will enter JumpApex state directly because we are already at our apex height.
Jump Start State
Feed ALI_ItemAnimLayers - FullBody_JumpStartState directly into output pose.

JumpStart -> JumpStartLoop
JumpStart- Enter
JumpStartLoopstateAutomaticRule
- Enter
When the short jump start animation finishes, we push the state to JumpStartLoop, and the AutomaticRule is here to ensure we won’t stuck in the JumpStart state.
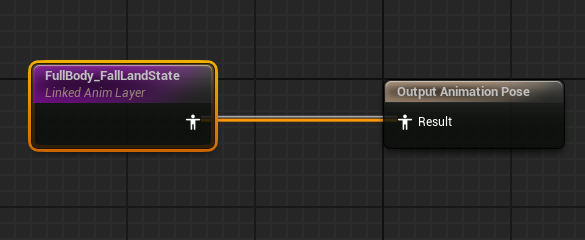
Jump Start Loop State
Feed ALI_ItemAnimLayers - FullBody_JumpStartLoopState directly into output pose.
JumpStartLoop -> JumpApex
JumpStartLoop- Enter
JumpApexstate- If
TimeToJumpApex< 0.4
- If
- Enter
The TimeToJumpApex is calculated in UpdateJumpFallData, if we are currently jumping, it will be -WorldVelocity.Z / GravityZ if we are not jumping, the value will be 0.0, this is a clever way to extract the data. Because as we grapdually reach the apex, our velocity will decrease to 0. While GravityZ is a constant value.
Jump Apex State
Feed ALI_ItemAnimLayers - FullBody_JumpApexState directly into output pose.

JumpApex -> FallLoop
JumpApex- Enter
FallLoopstateAutomaticRule
- Enter
When JumpApex state is done, we will enter FallLoop state, and the AutomaticRule is here to ensure we won’t stuck in the JumpApex state.
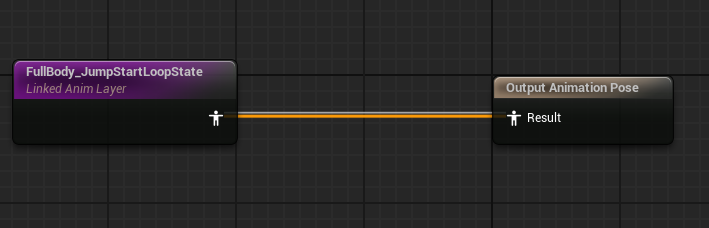
Fall Loop State
Feed ALI_ItemAnimLayers - FullBody_FallLoopState directly into output pose.
FallLoop -> FallLand
FallLoop- Enter
FallLandstate- If
GroundDistance< 200.0
- If
- Enter
When we are about to hit the ground, a new animation will be played to blend out jumping.
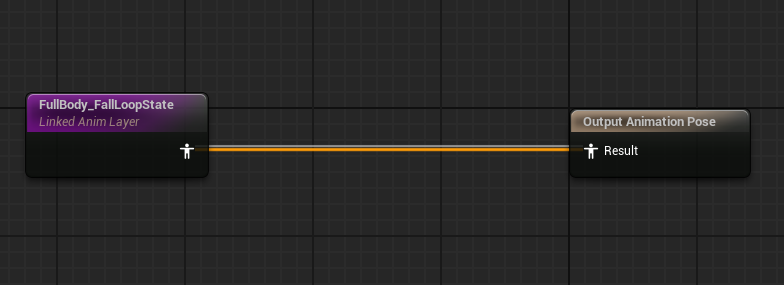
Fall Land State
Feed ALI_ItemAnimLayers - FullBody_FallLandState directly into output pose.
FallLand -> EndInAir
FallLand- Enter
EndInAirconduit- If
IsOnGround
- If
- Enter
When we are done with the landing animation, we will enter EndInAir conduitgv`
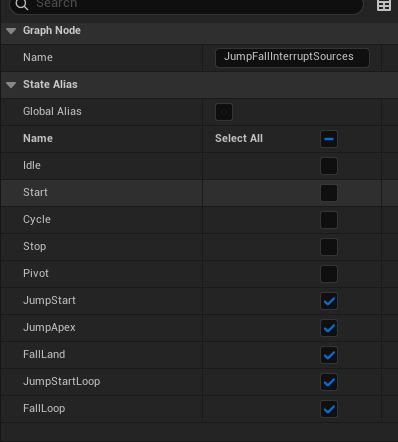
Jump Fall Interrupt Sources
This is a StateAlias of all states in Jumping part, meaning any states can enter the jump state.
JumpFallInterruptSources -> EndInAir
JumpFallInterruptSources- Enter
EndInAirconduit- If
IsOnGround
- If
- Enter
At anytime, as long as we are in the jumping state, if something weird happens and directly put us on the ground, we will just ignore all other states and directly land here at EndInAir conduit.
EndInAir Conduit
Another conduit, nothing new here.
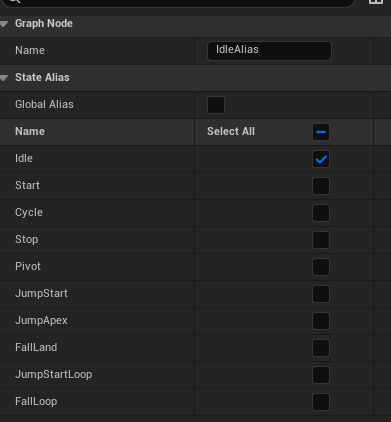
EndInAir -> CycleAlias/IdleAlias
EndInAir- Enter
CycleAliasstate- If
HasAcceleration(Priority 1)
- If
- Enter
IdleAliasstateTrue(Priority 2)
- Enter
After we EndInAir, if we are still moving, we will enter CycleAlias state, otherwise we will enter IdleAlias state.

BlueprintThreadsafeUpdateAnimation
Now we have finished the whole Locomotion State Machine, which is reading and updating tons of variables, some related to the game, some related to the character. But where did these variables come from? If we look at the UE4 way, usually these gets updated in the Event Graph, but here in Lyra if we open the Event Graph, we will see the following two comments:
This AnimBP does not run any logic in its Event Graph. Logic in the Event Graph is processed on the Game Thread. Every tick, the Event Graph for each AnimBP must be run one after the other in sequence, which can be a performance bottleneck. For this project, we’ve instead used the new BlueprintThreadsafeUpdateAnimation function (found in the My Blueprint tab). Logic in BlueprintThreadsafeUpdateAnimation can be run in parallel for multiple AnimBP’s simultaneously, removing the overhead on the Game Thread.
That’s right, nothing is running in the Event Graph because it’s not optimized for performance. Instead, we are using BlueprintThreadsafeUpdateAnimation function, which is a new function that allows us to run logic in parallel for multiple AnimBPs simultaneously. This removes the overhead on the Game Thread and allows us to run logic in a more efficient way. Open the BlueprintThreadsafeUpdateAnimation function, and we will see the following comment:
This function is primarily responsible for gathering game data and processing it into useful information for selecting and driving animations. A caveat with Threadsafe functions is that we can’t directly access data from game objects like we can in the Event Graph. This is because other threads could be running at the same time and they could be changing that data. Instead, we use the Property Access system to access data. The Property Access system will copy the data automatically when it’s safe. Here’s an example where we access the Pawn owner’s location (search for “Property Access” from the context menu).
All the functions are quite straightforward, so we won’t go too deep into them, here’s a brief overview of what’s going on:
UpdateLocationData- Update the current location of the character, as well as the d
elta displacement.
- Update the current location of the character, as well as the d
UpdateRotationData- Update the current rotation, as well as the
delta yaw, thisdelta yawis then divided bydelta secondsto get thedelta yaw changing speed, which is used to calculate theAdditiveLeanAngle
- Update the current rotation, as well as the
UpdateVelocityData- Updates
WorldVelocity,LocalVelocity,LocalVelocity2D,LocalVelocityDirectionAngle,LocalVelocityDirectionAngleWithOffset(againstRootYawOffset) - Also updates the Cardinal Representation (Left, Right, Forward, Backward) of the velocity, both with and without
RootYawOffset
- Updates
UpdateAccelerationData- Updates
WorldAcceleration,LocalAcceleration,PivotDirection2D,CardinalDirectionFromAcceleration - This is where the
Pivotstate is mainly concerning, the comment here says “Calculate a cardinal direction from acceleration to be used for pivots. Acceleration communicates player intent better for that purpose than velocity does.”
- Updates
UpdateWallDetectionHeuristic- If we are having an acceleration yet we aren’t really speeding up, and our velocity direction is a far from where we are trying to go, the we probably has hit a wall.
UpdateCharacterStateData- Update states related to
Character, includingOnGround,Crouch,ADSState,WeaponFirdState,IsJumping,IsFalling
- Update states related to
UpdateBlendWeightData- We have talked about this before, if there’s a montage being played and we are on ground, we will update the
UpperbodyDynamicAdditiveWeightto1, otherwise we will gradually interpolat it to0.0
- We have talked about this before, if there’s a montage being played and we are on ground, we will update the
UpdateRootYawOffset- The whole function is just trying to update
RootYawOffsetunder different scenarios. - Comment in this function says “This function handles updating the yaw offset depending on the current state of the Pawn owner.”
- Case 1:
- “When the feet aren’t moving (e.g. during Idle), offset the root in the opposite direction to the Pawn owner’s rotation to keep the mesh from rotating with the Pawn.”
- Case 2:
- “When in motion, smoothly blend out the offset.”
- Case 3:
- “Reset to blending out the yaw offset. Each update, a state needs to request to accumulate or hold the offset. Otherwise, the offset will blend out. This is primarily because the majority of states want the offset to blend out, so this saves on having to tag each state.”
- Case 1:
RootYawOffsetModehas three options:Hold,Accumulate, andBlendOut.Holdmeans we won’t do anything to theRootYawOffset,Accumulatemeans we will keep adding to theRootYawOffsetwhile our torso rotates to a capped angle, andBlendOutmeans we will gradually reduce theRootYawOffsetto0.
- The whole function is just trying to update
UpdateAimingData- Update
AimPitch, which is just a normalized value ofBaseAimRotation.Pitch
- Update
UpdateJumpFallData- Update
TimeToJumpApex, we have talked about this before, so skipping it.
- Update
Turn In Place
When we update the RootYawOffset, eventually we will call SetRootYawOffset to update the RootYawOffset variable. There are a few notes left by Epic:
We clamp the offset because at large offsets the character has to aim too far backwards, which over twists the spine. The turn in place animations will usually keep up with the offset, but this clamp will cause the feet to slide if the user rotates the camera too quickly. If desired, this clamp could be replaced by having aim animations that can go up to 180 degrees or by triggering turn in place animations more aggressively.
We want aiming to counter the yaw offset to keep the weapon aiming in line with the camera.
After the yaw offset is too large, a correction animation will be played to reset the direction. In which there’s also a curve called TurnYawAnimationModifier, Epic commented:
When the yaw offset gets too big, we trigger TurnInPlace animations to rotate the character back. E.g. if the camera is rotated 90 degrees to the right, it will be facing the character’s right shoulder. If we play an animation that rotates the character 90 degrees to the left, the character will once again be facing away from the camera. We use the “TurnYawAnimModifier” animation modifier to generate the necessary curves on each TurnInPlace animation. See ABP_ItemAnimLayersBase for examples of triggering TurnInPlace animations.
ULyraAnimInstance
To this point, we have covered almost everything in this AnimBP, just to echo with one last thing that we’ve mentioned at the beginning, the AnimBP is not a normal Animation Instance subclass, but inherited from ULyraAnimInstance.
Just from the header file, we can see a few things:
- A
IsDataValidfunction is being overridden. This is a function that is called by the editor to validate the data in the asset. This is useful for ensuring that the asset is set up correctly and that all required data is present. - Normal
NativeInitializeAnimationandNativeUpdateAnimationfunctions are overridden. These are the standard functions that are called when the animation is initialized and updated. - A
InitializeWithAbilitySystemfunction is defined. We will go through it later GameplayTagPropertyMapandGroundDistanceare defined as properties. TheGameplayTagPropertyMapis a map of gameplay tags to blueprint variables, which allows for easy access to gameplay tags in blueprints. TheGroundDistanceproperty is used to store the distance from the character to the ground.
1
2
3
4
5
6
7
8
9
10
11
12
13
14
15
16
17
18
19
20
21
22
23
24
25
26
27
28
29
30
UCLASS(Config = Game)
class ULyraAnimInstance : public UAnimInstance
{
    GENERATED_BODY()

public:

    ULyraAnimInstance(const FObjectInitializer& ObjectInitializer);

    virtual void InitializeWithAbilitySystem(UAbilitySystemComponent* ASC);

protected:

#if WITH_EDITOR
    virtual EDataValidationResult IsDataValid(class FDataValidationContext& Context) const override;
#endif // WITH_EDITOR

    virtual void NativeInitializeAnimation() override;
    virtual void NativeUpdateAnimation(float DeltaSeconds) override;

protected:

    // Gameplay tags that can be mapped to blueprint variables. The variables will automatically update as the tags are added or removed.
    // These should be used instead of manually querying for the gameplay tags.
    UPROPERTY(EditDefaultsOnly, Category = "GameplayTags")
    FGameplayTagBlueprintPropertyMap GameplayTagPropertyMap;

    UPROPERTY(BlueprintReadOnly, Category = "Character State Data")
    float GroundDistance = -1.0f;
};
GameplayTagPropertyMap
To understand what this class does, let’s take a look at the implementation: The starting logic is quite simple, during initialization, we get ASC from the owning actor and call InitializeWithAbilitySystem to initialize the GameplayTagPropertyMap. This will form a mapping between FGameplayTag and a FProperty, one actual property on this class. And everytime when the tags has been changed with a new value, it will be set to the corresponding property as well. Pretty much the same like we write a OnTagChanged callback, and then set data to a property.
1
2
3
4
5
6
7
8
9
10
11
12
13
14
15
16
17
18
19
20
21
void ULyraAnimInstance::NativeInitializeAnimation()
{
    Super::NativeInitializeAnimation();

    if (AActor* OwningActor = GetOwningActor())
    {
        if (UAbilitySystemComponent* ASC = UAbilitySystemGlobals::GetAbilitySystemComponentFromActor(OwningActor))
        {
            InitializeWithAbilitySystem(ASC);
        }
    }
}

// ...

void ULyraAnimInstance::InitializeWithAbilitySystem(UAbilitySystemComponent* ASC)
{
    check(ASC);

    GameplayTagPropertyMap.Initialize(this, ASC);
}

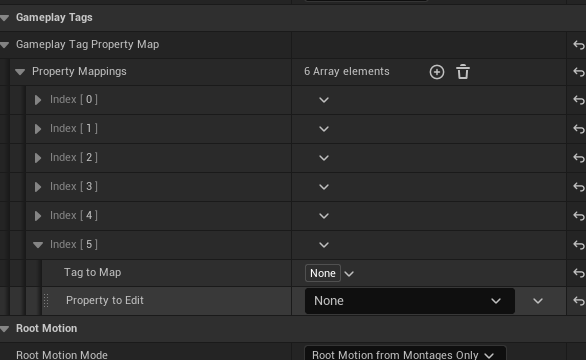
What really makes me interested is the PropertyToEdit here, how do we get a drop down of a dynamically created blueprint property? The answer is in the FGameplayTagBlueprintPropertyMapping struct:
TFieldPath<FProperty>is a type of property that allows us to reference a property on a class by its name
1
2
3
4
5
6
7
8
9
10
11
12
13
14
15
16
17
/**
 * Struct used to update a blueprint property with a gameplay tag count.
 * The property is automatically updated as the gameplay tag count changes.
 * It only supports boolean, integer, and float properties.
 */
USTRUCT()
struct GAMEPLAYABILITIES_API FGameplayTagBlueprintPropertyMapping
{
    GENERATED_BODY()

public:
    // ...
    /** Property to update with the gameplay tag count. */
    UPROPERTY(VisibleAnywhere, Category = GameplayTagBlueprintProperty)
    TFieldPath<FProperty> PropertyToEdit;
    // ...
};
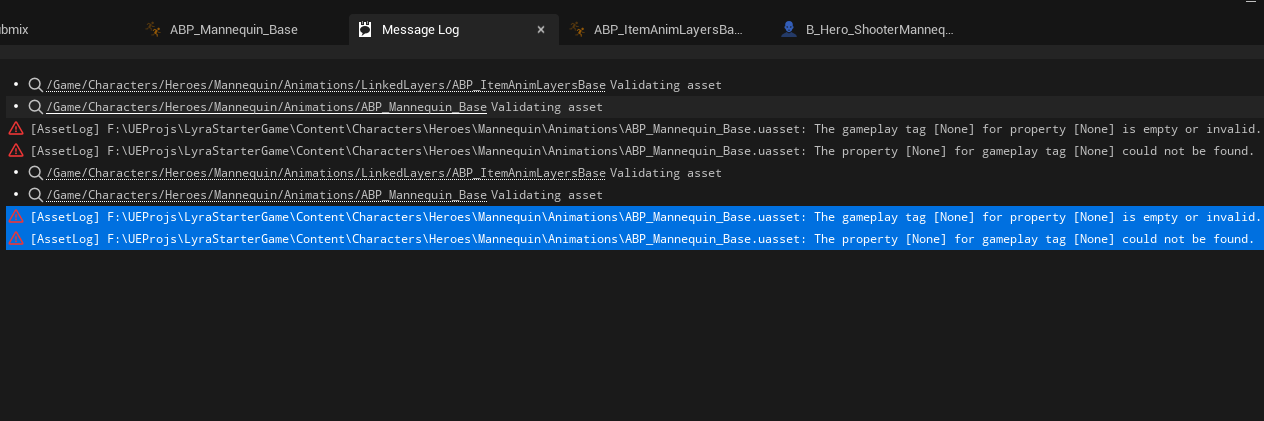
“By it’s name?!” I hear you scream. Yes, I know what you’re thinking. A simple rename of the property will break the mapping here. Although it’s not a very big problem, because even we are using some sort of reference to the property, we can still delete it and cause a null reference here. What’s really important is that the user could be propertly notified about this error. And that’s where validation would kick in.
Everytime the blueprint saves or we manually called validation on the data. The IsDataValid function will be called. This is where we can check if the property is valid or not. If it’s not, we can return an error message to the user.
1
2
3
4
5
6
7
8
9
10
#if WITH_EDITOR
EDataValidationResult ULyraAnimInstance::IsDataValid(FDataValidationContext& Context) const
{
    Super::IsDataValid(Context);

    GameplayTagPropertyMap.IsDataValid(this, Context);

    return ((Context.GetNumErrors() > 0) ? EDataValidationResult::Invalid : EDataValidationResult::Valid);
}
#endif // WITH_EDITOR
With IsDataValid we are essentially calling the underlying IsDataValid function on the FGameplayTagBlueprintPropertyMapping struct. This will check if all the properties are valid. It will fail to compile, and an error will be logged.
GroundDistance
Only one thing left for this class, the GroundDistance property. This is a simple float value that stores the distance from the character to the ground. This is used to determine if the character is on the ground or not so we can transition from jump to land state. The value is updated every frame in NativeUpdateAnimation.
1
2
3
4
5
6
7
8
9
10
11
12
13
14
void ULyraAnimInstance::NativeUpdateAnimation(float DeltaSeconds)
{
    Super::NativeUpdateAnimation(DeltaSeconds);

    const ALyraCharacter* Character = Cast<ALyraCharacter>(GetOwningActor());
    if (!Character)
    {
        return;
    }

    ULyraCharacterMovementComponent* CharMoveComp = CastChecked<ULyraCharacterMovementComponent>(Character->GetCharacterMovement());
    const FLyraCharacterGroundInfo& GroundInfo = CharMoveComp->GetGroundInfo();
    GroundDistance = GroundInfo.GroundDistance;
}
ABP_ItemAnimLayersBase
We are not done yet! Way to go! (Just kidding, feel free to go asleep and come back later, I know this is an exhausting trip :D)
This section can be started with the following introduction by Epic:
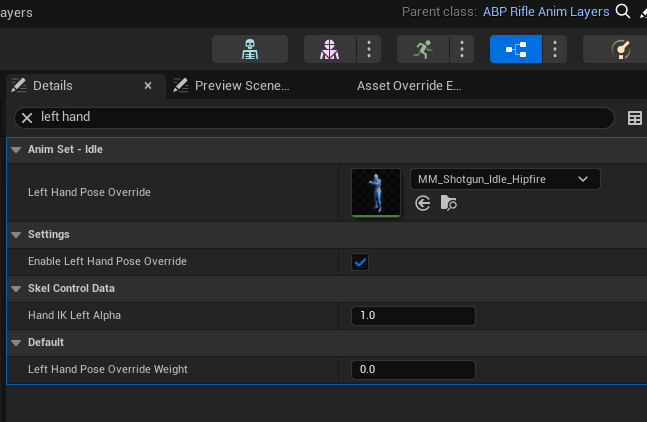
This animbp was authored to handle the logic for common weapon types, like Rifles and Pistols. If custom logic is needed (e.g. for a weapon like a bow), a different animbp could be authored that implements the ALI_ItemAnimLayers interface. Rather than referencing animation assets directly, this animbp has a set of variables that can be overridden by Child Animation Blueprints. These variables can be found in the “Anim Set - X” categories in the My Blueprint tab. This allows us to reuse the same logic for multiple weapons without referencing (and thus loading) the animation content for each weapon in one animbp. See ABP_RifleAnimLayers for an example of a Child Animation Blueprint that provides values for each “Anim Set” variable.
A fancy feature is the ABP_ItemAnimLayersBase, despite not inherit from ULyraAnimInstance, it implements a method to access properties from the ABP_Mannequin_Base class. So the properties are effectively shared between the two classes.
Item Anim Layers
With previous knowledge, it should be easier to understand. Let’s first examine these ALI interfaces.
LeftHandPose_OverrideState
We have discussed this before, the first pose of left hand override state is being blended to the input pose. The animation asset is a variable LeftHandPoseOverride.

FullBody_SkeletalControls
Also discussed in the IK Fixup section already.
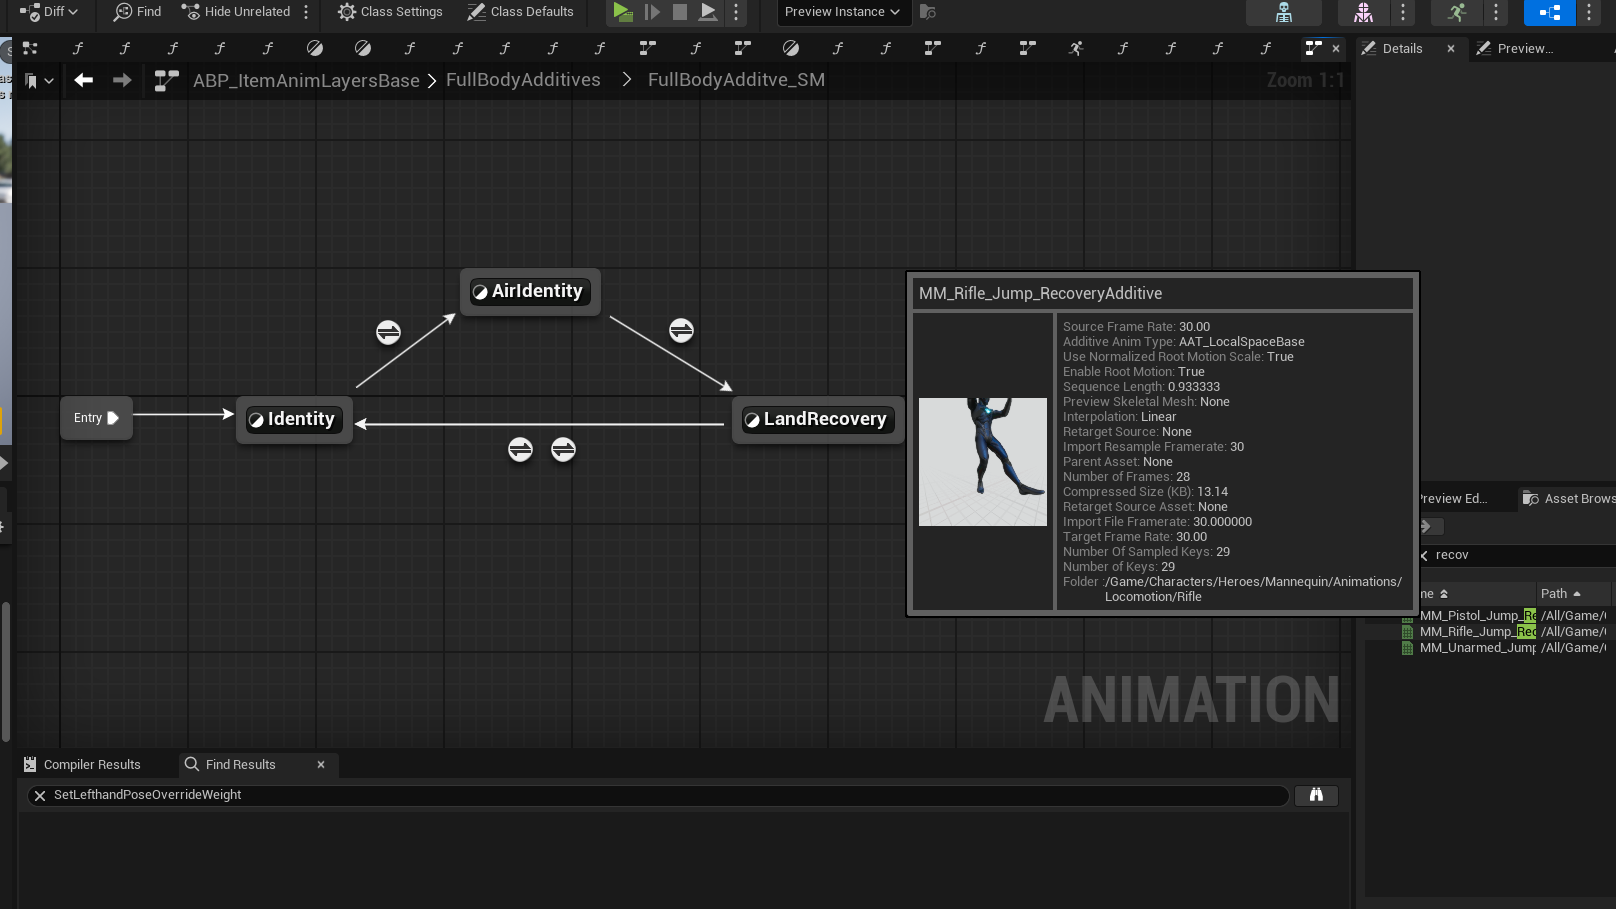
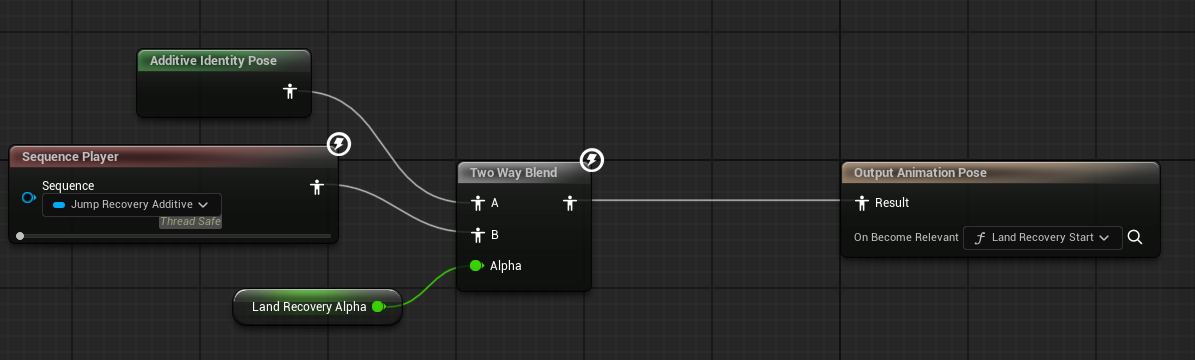
FullBodyAdditives
Three states SM, yet there’s nothing in the Identity and AirIdentity state, as the name indicated, they represent “Nothing” (A.K.A identity pose), add them to anything wwon’t change that original pose.

The whole purpose of having this state here is to player the jump landing recovery animation.
FullBody_IdleState
This state machine authors the logic for standing still and turn in place.
This animbp implements a layer for each state in AnimBP_Mannequin_Base. Layers can play a single animation, or contain complex logic like state machines.
Idle- Enter
IdleBreakState- If
TimeUntilIdleBreak< 0.0
- If
- Enter
TurnInPlaceState- If
Abs(RootYawOffset)> 50.0 (Shared)
- If
- Enter

Inside the Idle Sub SM, we can see that it’s just switching the crouch and uncrouch state.
IdleBreak- Enter
IdleState- If !
GameplayTag_IsFiring(Priority 1) - Or !
CanPlayIdleBreak(Priority 2) - Or
AutomaticRule(Priority 2)
- If !
- Enter
TurnInPlaceState- If
Abs(RootYawOffset)> 50.0 (Shared)
- If
- Enter

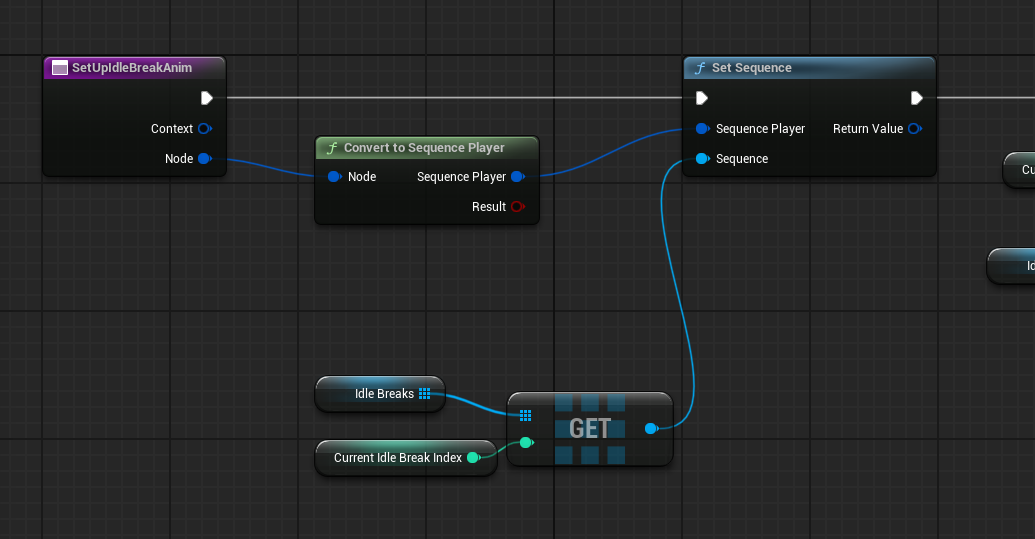
Idle Break animations are played when the character is idle for a certain amount of time. The TimeUntilIdleBreak variable is used to determine when to play the animation. If the character is not firing and the CanPlayIdleBreak variable is true, the animation will be played. The AutomaticRule is used to ensure that the animation will be played if the other conditions are not met.
The interesting part here is the Sequence Player aren’t referencing animation directly, instead, it’s calling the SetUpIdleBreakAnim function when OnBecomeRelevant, which references an IdleBreak array of assets
TurnInPlace- Enter
TurnInPlaceRevoveryState- If
GetCurveValue(TurnYawWeight)== 0.0
- If
- Enter
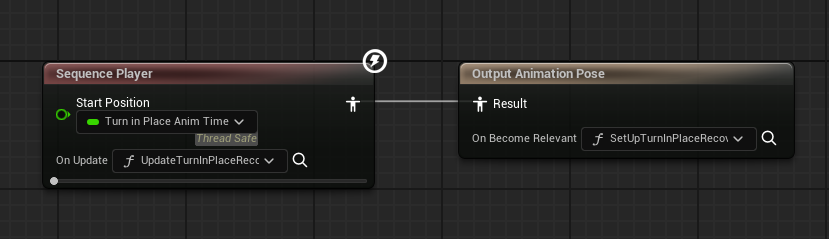
Similarly, we call the SetUpTurnInPlaceAnim to set the animation asset variable. During update, it will auto select a correct turn in place animation based on the Direction variable.

TurnInPlaceRecovery- Enter
IdleStateAutomaticRule
- Enter
TurnInPlaceState- If
Abs(RootYawOffset)> 50.0 (Shared)
- If
- Enter
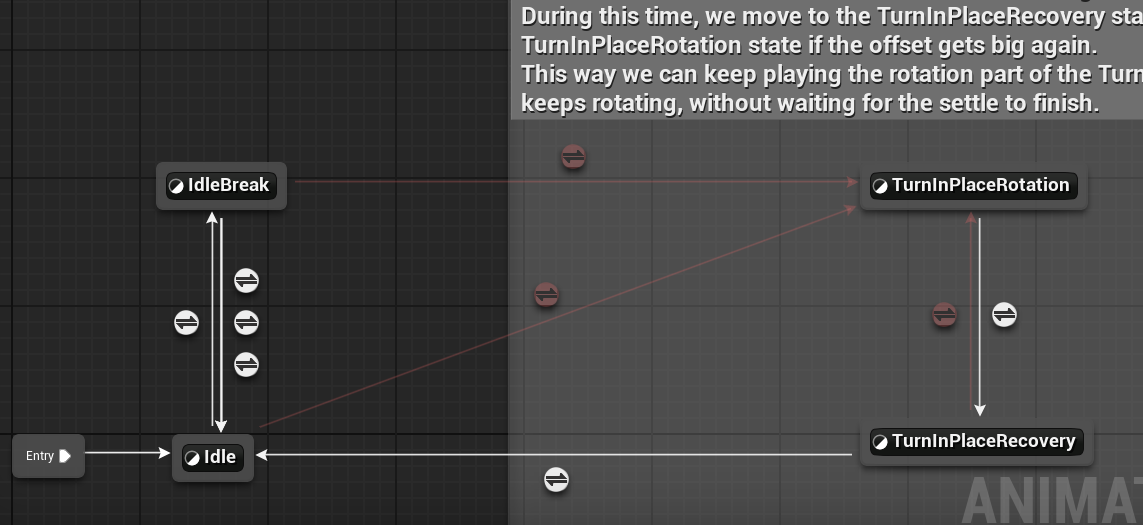
Epic also explained the design intention behind this part in the comment:
When the yaw offset gets big enough, we trigger a TurnInPlace animation to reduce the offset. TurnInPlace animations often end with some settling motion when the rotation is finished. During this time, we move to the TurnInPlaceRecovery state, which can transition back to the TurnInPlaceRotation state if the offset gets big again. This way we can keep playing the rotation part of the TurnInPlace animations if the Pawn owner keeps rotating, without waiting for the settle to finish.
FullBody_StartState
In this state, Epic left two comments:
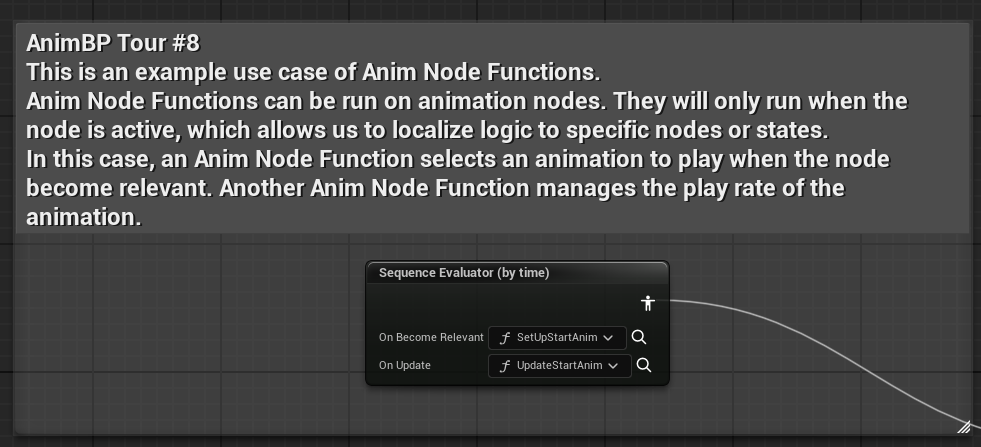
This is an example use case of Anim Node Functions. Anim Node Functions can be run on animation nodes. They will only run when the node is active, which allows us to localize logic to specific nodes or states. In this case, an Anim Node Function selects an animation to play when the node become relevant. Another Anim Node Function manages the play rate of the animation.
At this point we’ve already seen this Anim Node Functions for a million times. So it’s no longer a mystery to us.
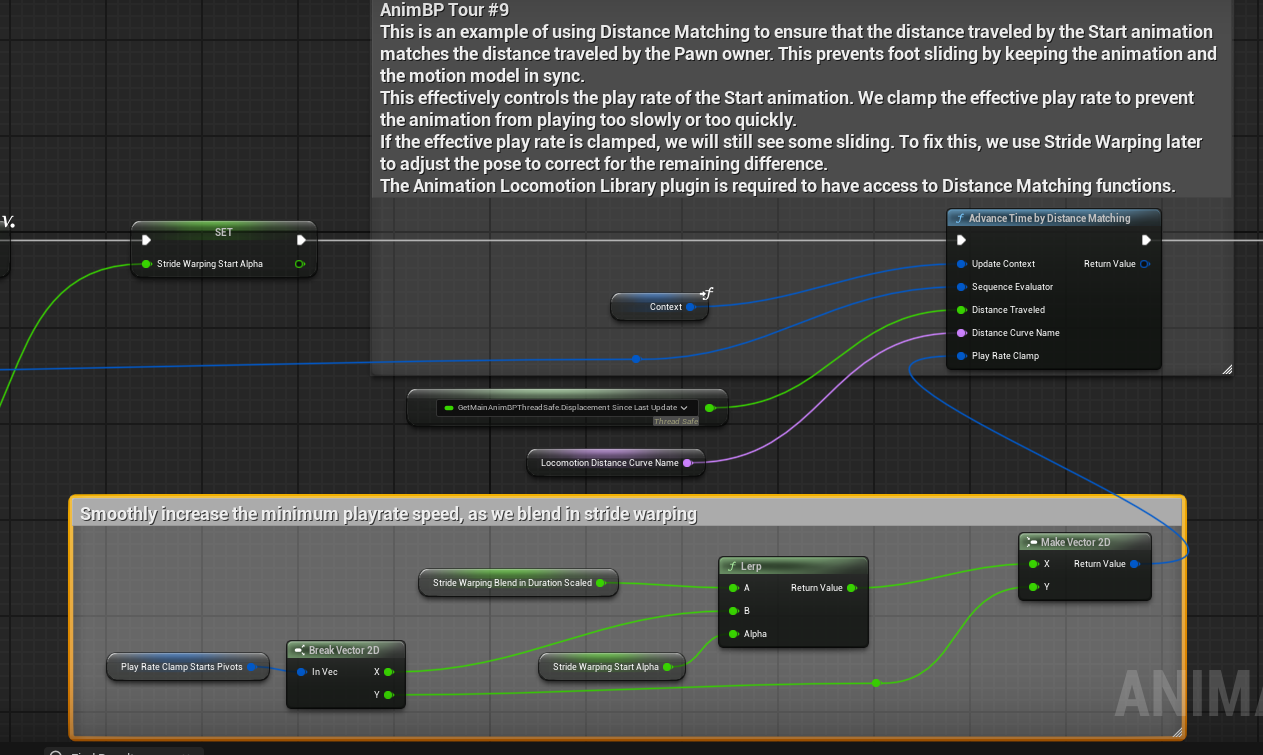
Next we have two distance matching functions, one is DistanceMatching, the other is StrideWarper. The first one is used to match the distance traveled by the animation to the distance traveled by the Pawn owner. The second one is used to warp the animation to match the speed of the Pawn owner.
This is an example of using Distance Matching to ensure that the distance traveled by the Start animation matches the distance traveled by the Pawn owner. This prevents foot sliding by keeping the animation and the motion model in sync. This effectively controls the play rate of the Start animation. We clamp the effective play rate to prevent the animation from playing too slowly or too quickly. If the effective play rate is clamped, we will still see some sliding. To fix this, we use Stride Warping later to adjust the pose to correct for the remaining difference. The Animation Locomotion Library plugin is required to have access to Distance Matching functions.
Luckily, Epic has wrapped these two giant functions into a single node - Orientation Warping and Stride Warping.
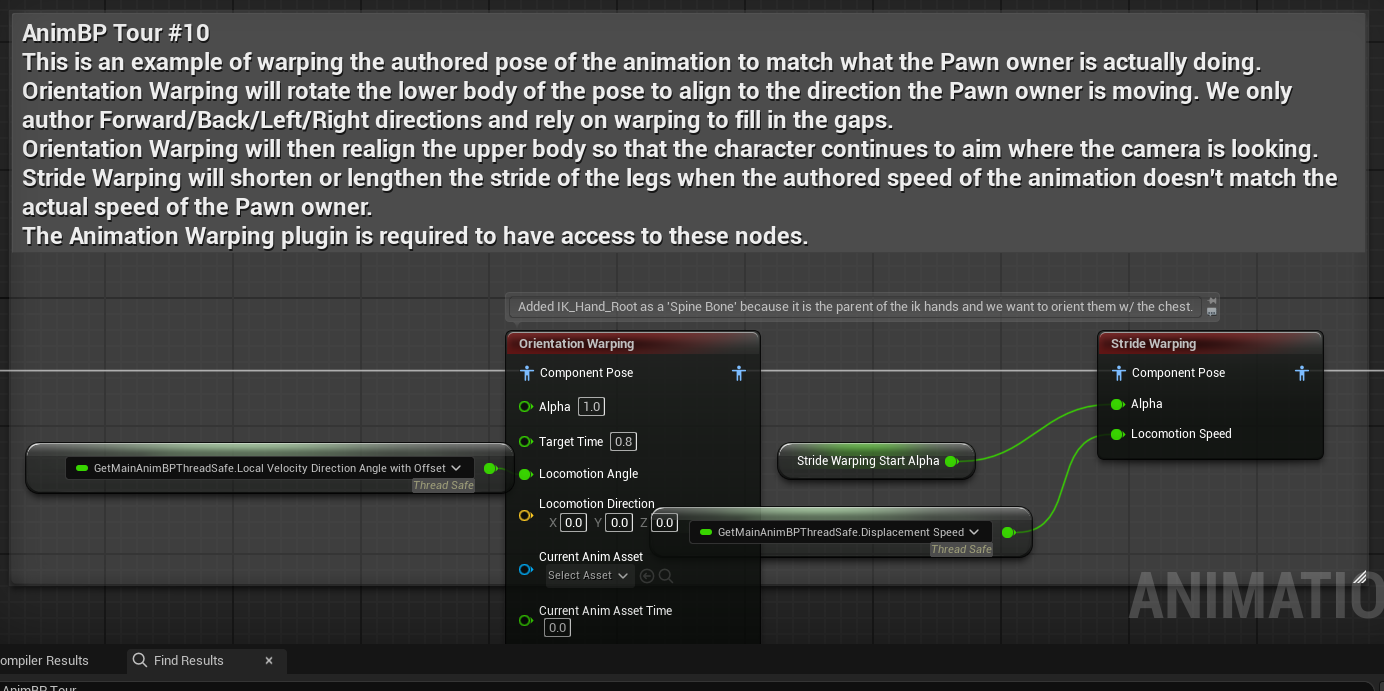
This is an example of warping the authored pose of the animation to match what the Pawn owner is actually doing.
Orientation Warping will rotate the lower body of the pose to align to the direction the Pawn owner is moving. We only author Forward/Back/Left/Right directions and rely on warping to fill in the gaps.
Orientation Warping will then realign the upper body so that the character continues to aim where the camera is looking.
Stride Warping will shorten or lengthen the stride of the legs when the authored speed of the animation doesn’t match the actual speed of the Pawn owner. The Animation Warping plugin is required to have access to these nodes.
FullBody_CycleState
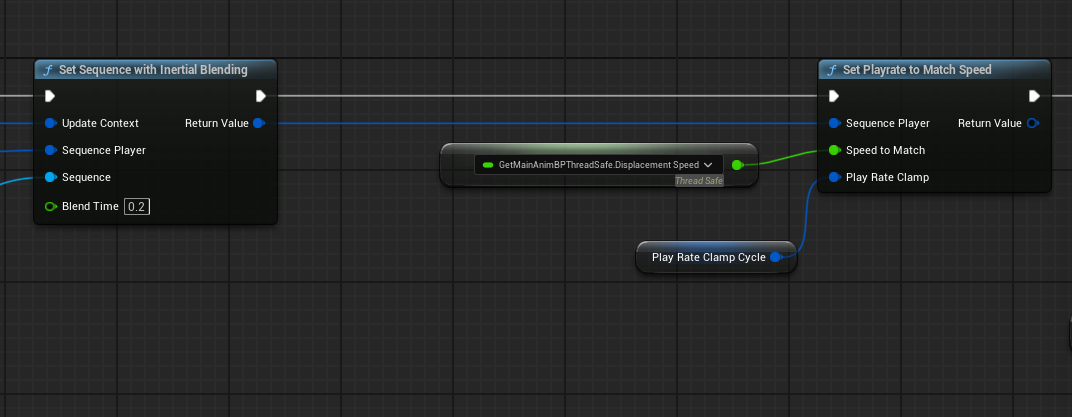
In UE4, we might just cover the locomotion part in a 2d blendspace, but this is not the case in Lyra, for this state, aside from the still active Stride Warping and Orientation Warping, the actual animations are being picked from UpdateCycleAnim function based on current CardinalDirection we’ve calculated.
We also called SetPlayrateToMatchSpeed here (Very much alike what a blendspace does).
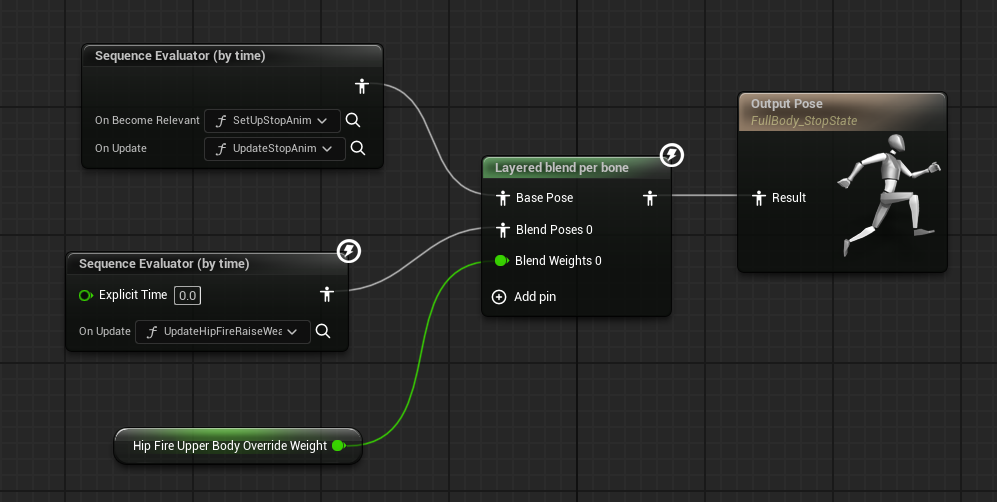
FullBody_StopState
Nothing new here, we have covered all knowledges for this state.
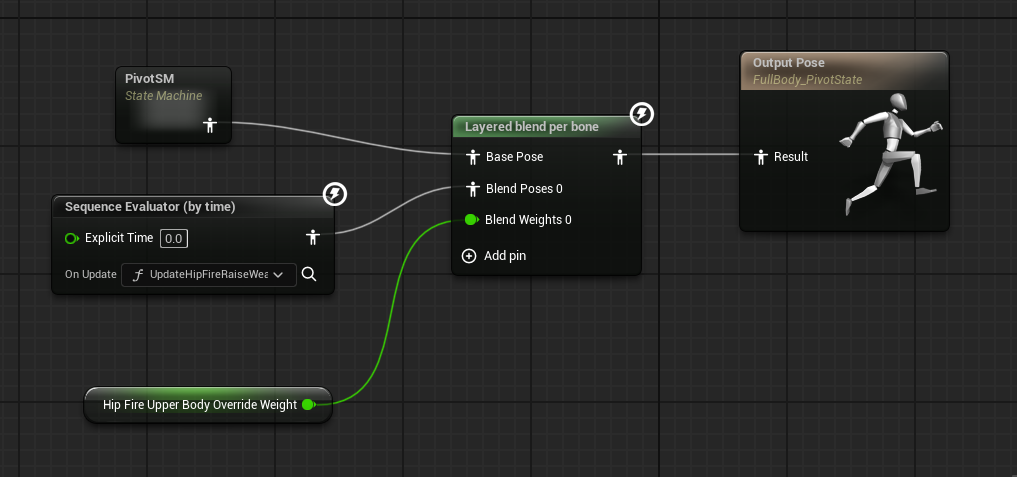
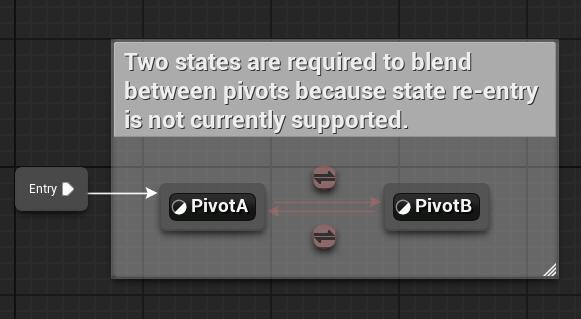
FullBody_PivotState
PivotState is controlled by PivotSM, similar to CycleState a function is being called to select correct pivot change animation.
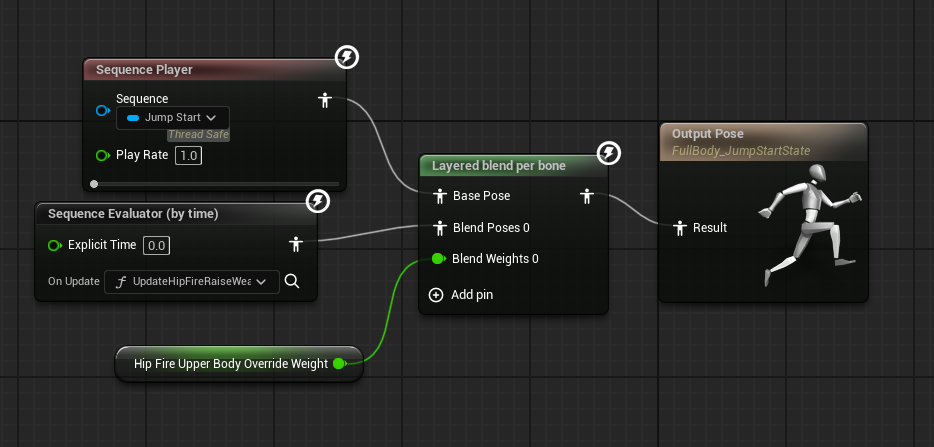
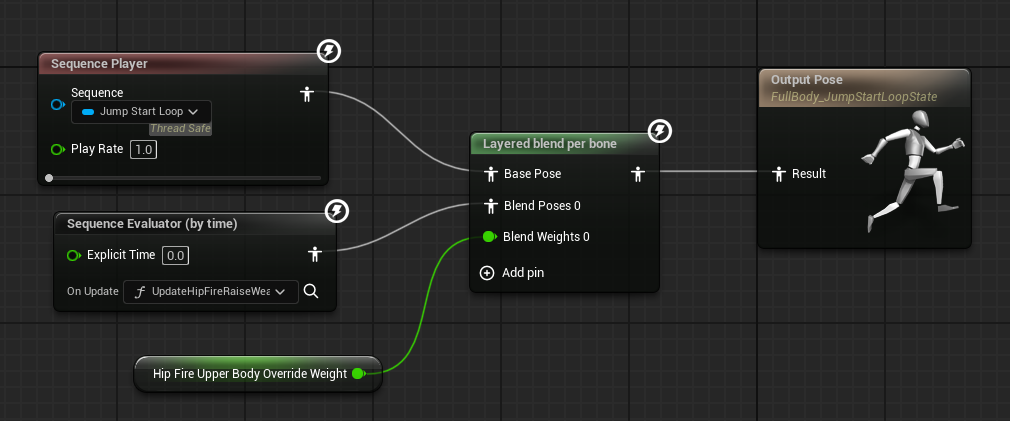
FullBody_JumpStartState
Feed JumpStart animation and blend with HipFireRaiseWeaponPose for current weapon
FullBody_JumpStartLoopState
Feed JumpStartLoop animation and blend with HipFireRaiseWeaponPose for current weapon
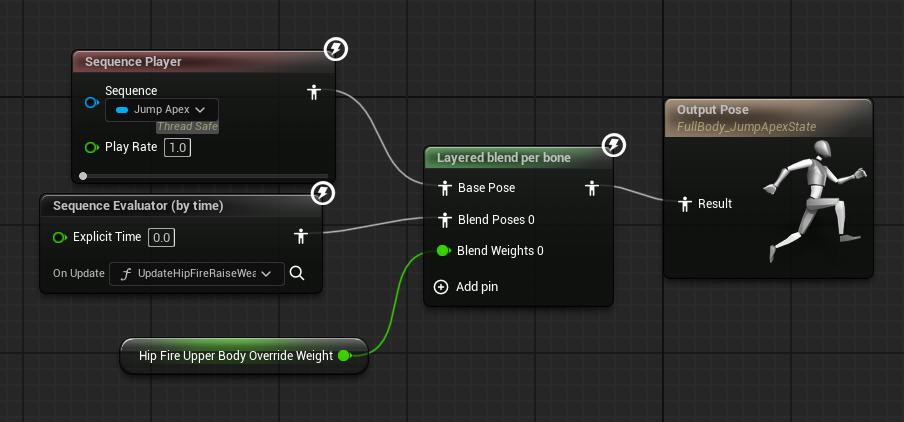
FullBody_JumpApexState
Feed JumpApex animation and blend with HipFireRaiseWeaponPose for current weapon
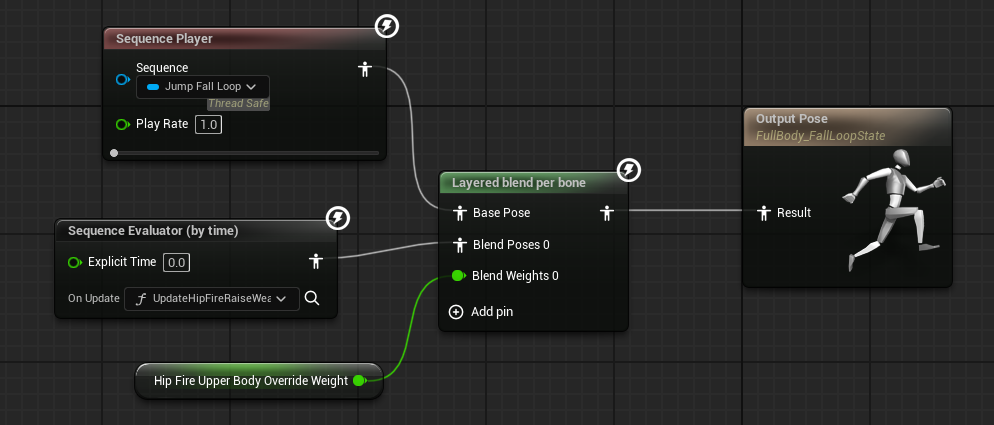
FullBody_FallLoopState
Feed JumpFallLoop animation and blend with HipFireRaiseWeaponPose for current weapon
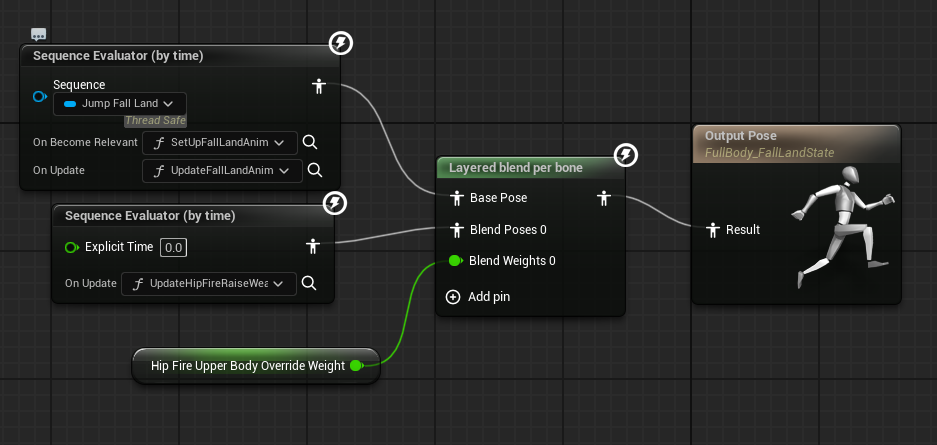
FullBody_FallLandState
Feed JumpFallLand animation and blend with HipFireRaiseWeaponPose for current weapon
Also called UpdateFallLandAnim per update tick, to do distance matching towards the landing target.
FullBody_Aiming
The traditional AnimOffset method, nothing new here.

Update Animations
That’s the anatomy of the AnimGraph, now same old, we need to provide and update the data needed.
To update the variables, we are still using BlueprintThreadsafeUpdateAnimation while left the Event Graph empty. Here’re a few comments left by Epic:
As with AnimBP_Mannequin_Base, this animbp performs its logic in BlueprintThreadSafeUpdateAnimation. Also, this animbp can access data from AnimBP_Mannequin_Base using Property Access and the GetMainAnimBPThreadSafe function. An example is below.
The logic here is really not that complex, comparing with the one in ABP_Mannequin_Base:
UpdateBlendWeightData- Update
UpperbodyDynamicAdditiveWeightandAimOffsetBlendWeight
- Update
UpdateJumpFallData- Update
TimeFallingto be the time since the last in air state
- Update
UpdateSkelControlsData- Based on
DisableLHandIKandDisableRHandIKto update theHandIKLeftAlphaandHandIKRightAlpha
- Based on
Takeaways
Phew, that was tough, but we made it! It’s really nice to see how Epic implemented such system, while a lot of these things are pretty common for AAA games, it’s way way way more complex than an indie game needs, so if the reader is thinking about using this system in their next solo or 3 persons project. I would recommend just learn the engineering process behind it than actually use it.